How to set up Google Workspace SSO for your Multi Academy Trust using the new SAML process

Summary
- Set up Google Workspace SAML SSO in three phases, working through them in order.
- Phase I: Create a custom SAML app for ClickView and copy your IdP SSO URL, Entity ID, and certificate.
- Phase II: Send those details to ClickView Support, then enter the ACS URL and Entity ID they return.
- Phase III: Map basic attributes plus role and school identification, then enable the app for all users.
- Decide early how you’ll identify each user’s role and school using Org Unit path, Department, Google Groups, or a custom attribute.
- Changes can take up to 24 hours to apply across all users.
This guide is for IT Administrators and Multi Academy Trust Leaders connecting ClickView to a Google Workspace environment using SAML-based Single Sign-On. Once setup is complete, your staff and students can sign in to ClickView through your existing Google identity provider.
Before you start: This setup requires email exchanges with ClickView Support at defined points. Each phase builds on the last, so work through them in order.
- Phase I: Create the ClickView SAML app and copy your Google IdP details.
- Phase II: Send your IdP details to ClickView Support, then enter the ACS URL and Entity ID they return.
- Phase III: Map your attributes, configure role and school identification, and enable the app.
Phase I: Create the ClickView SAML app
Step 1: Create a new application
- Sign in to the Google Workspace Admin console with an admin account.
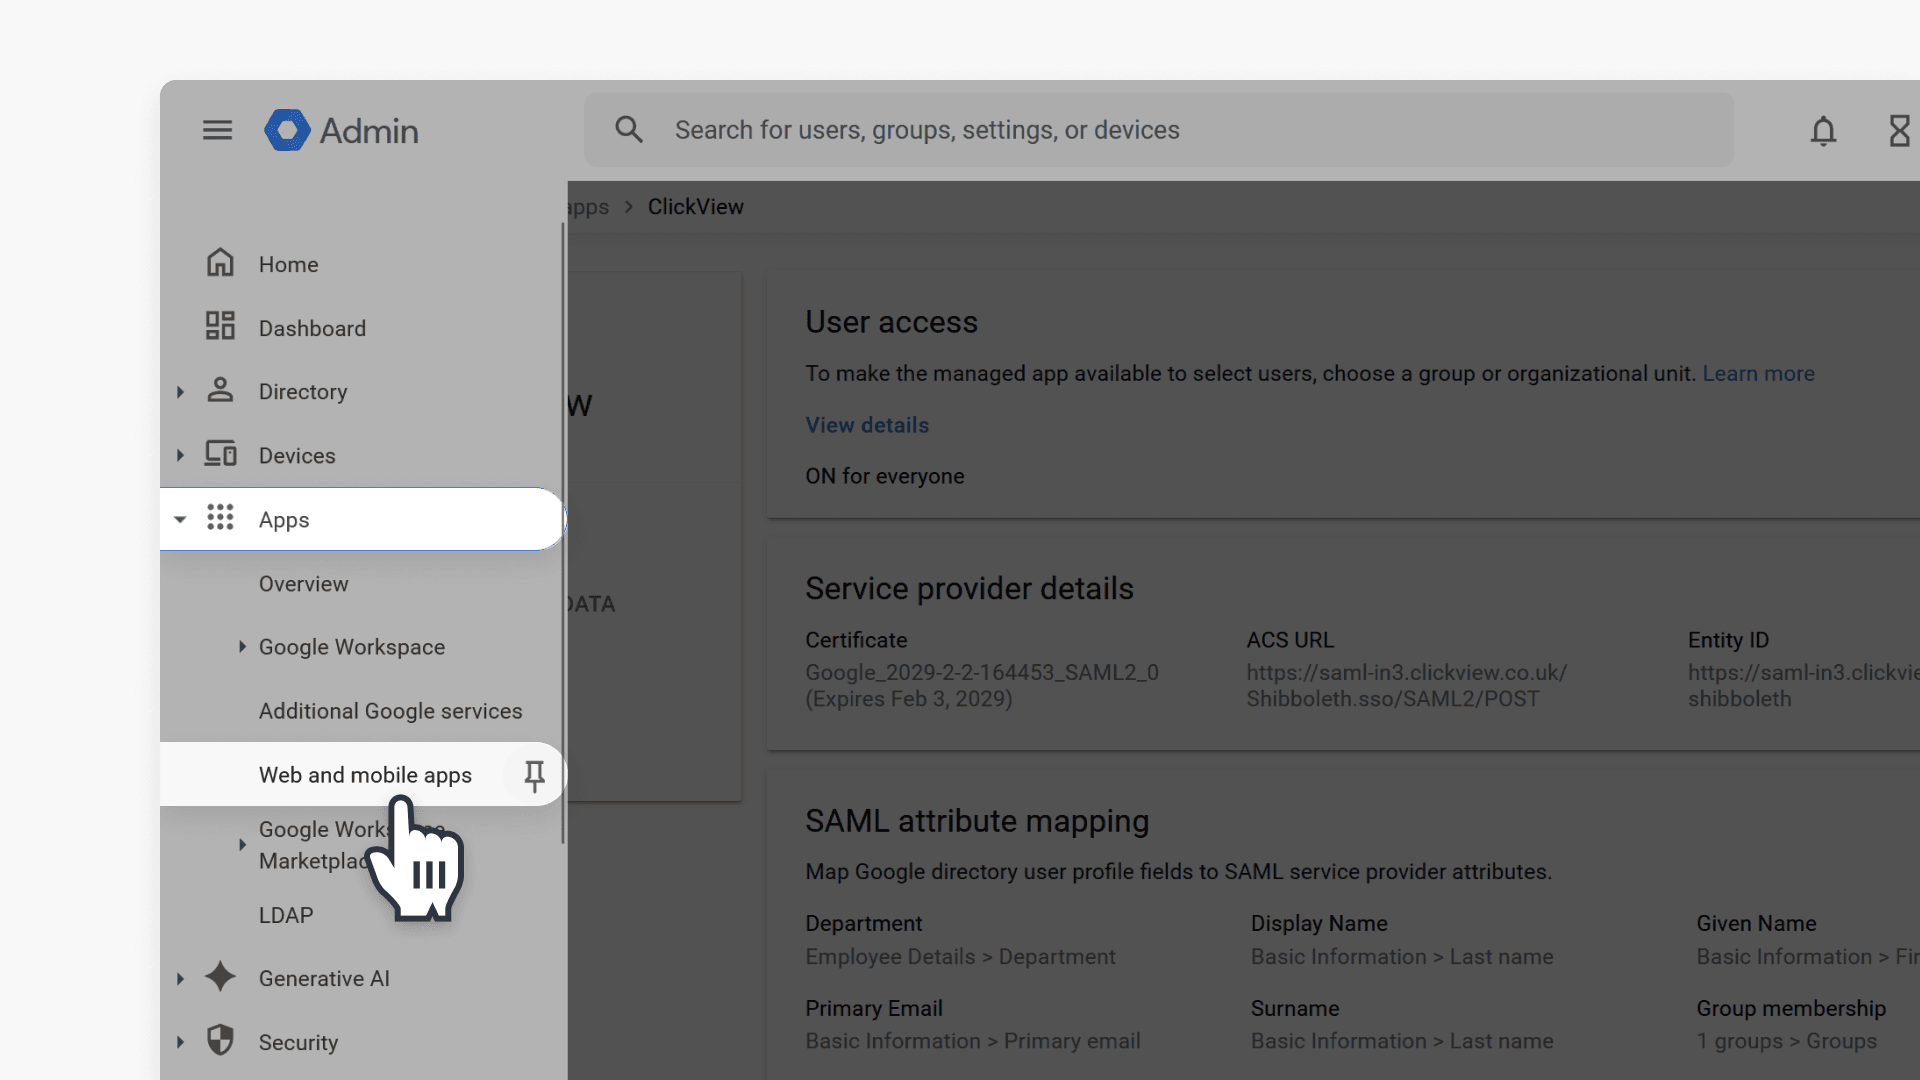
- In the left-hand pane, select Apps, then Web and mobile apps.
Step 2: Create a custom SAML app
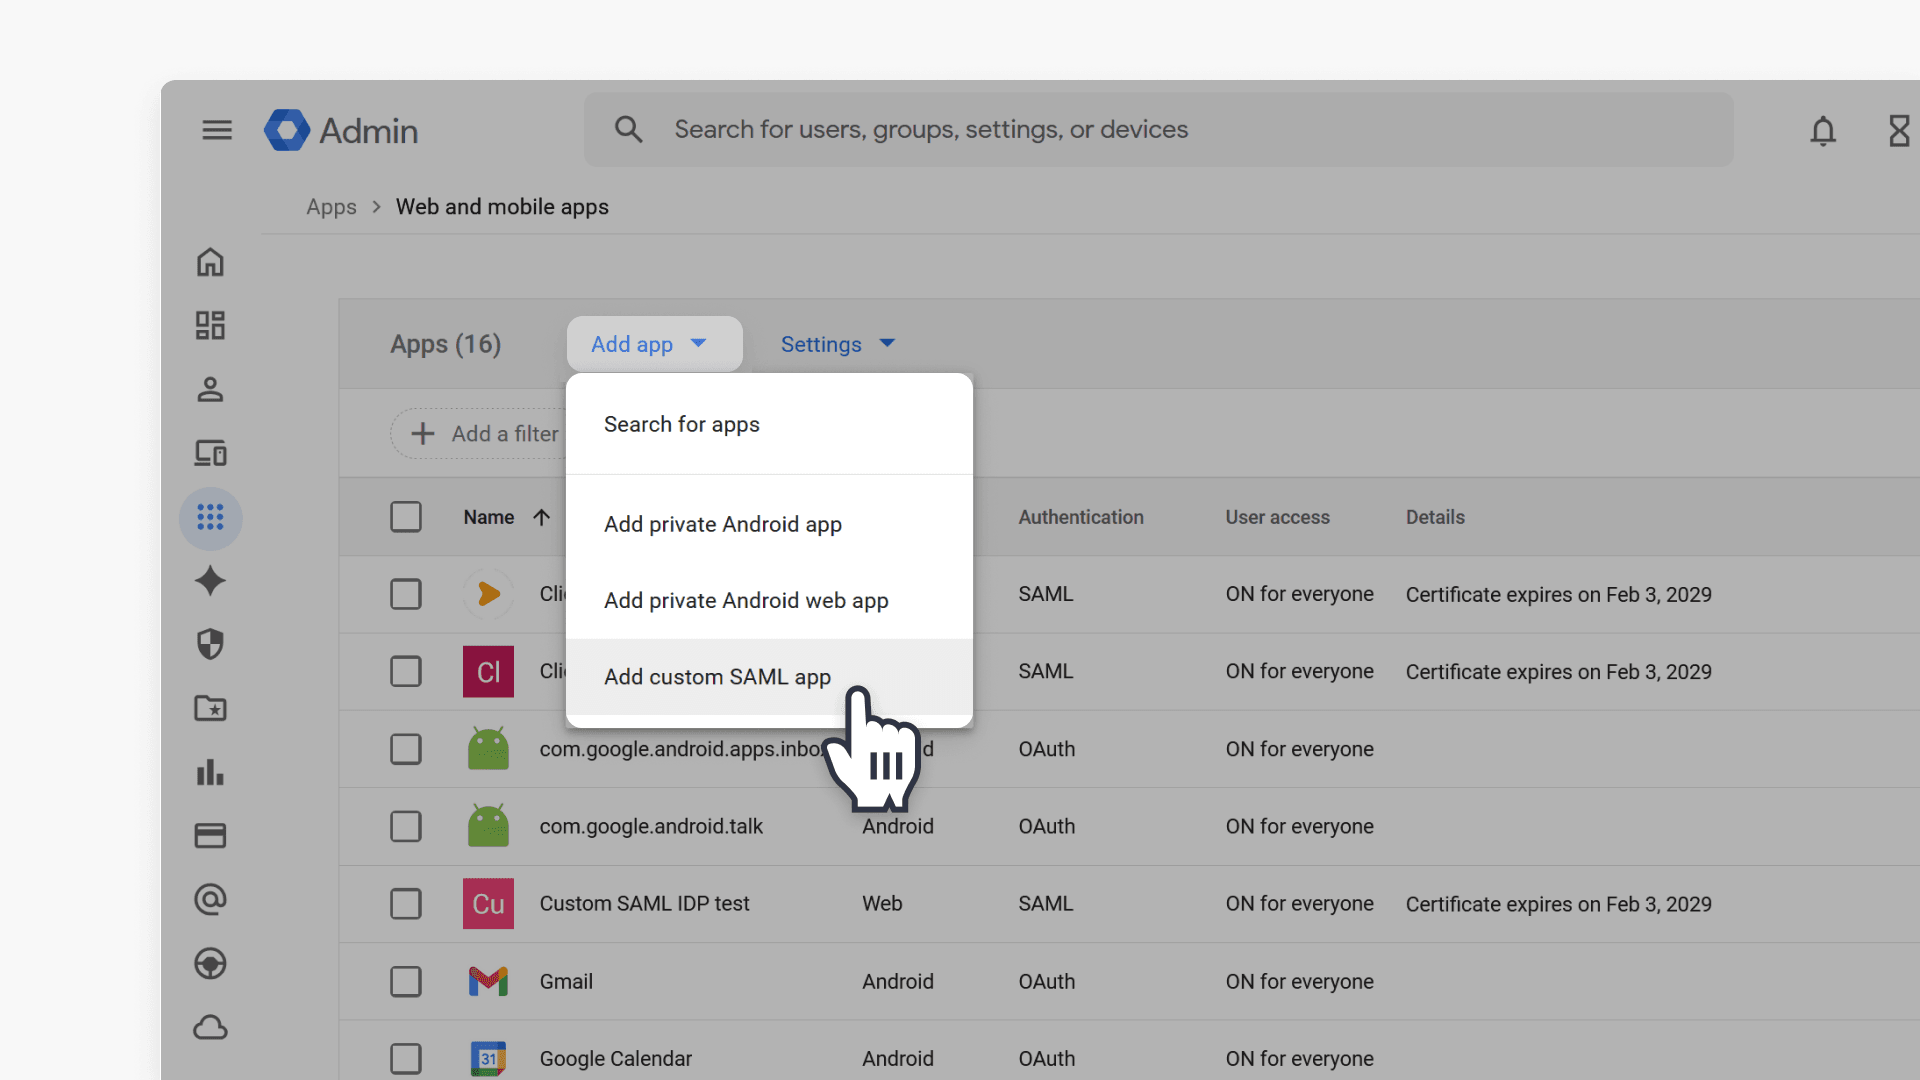
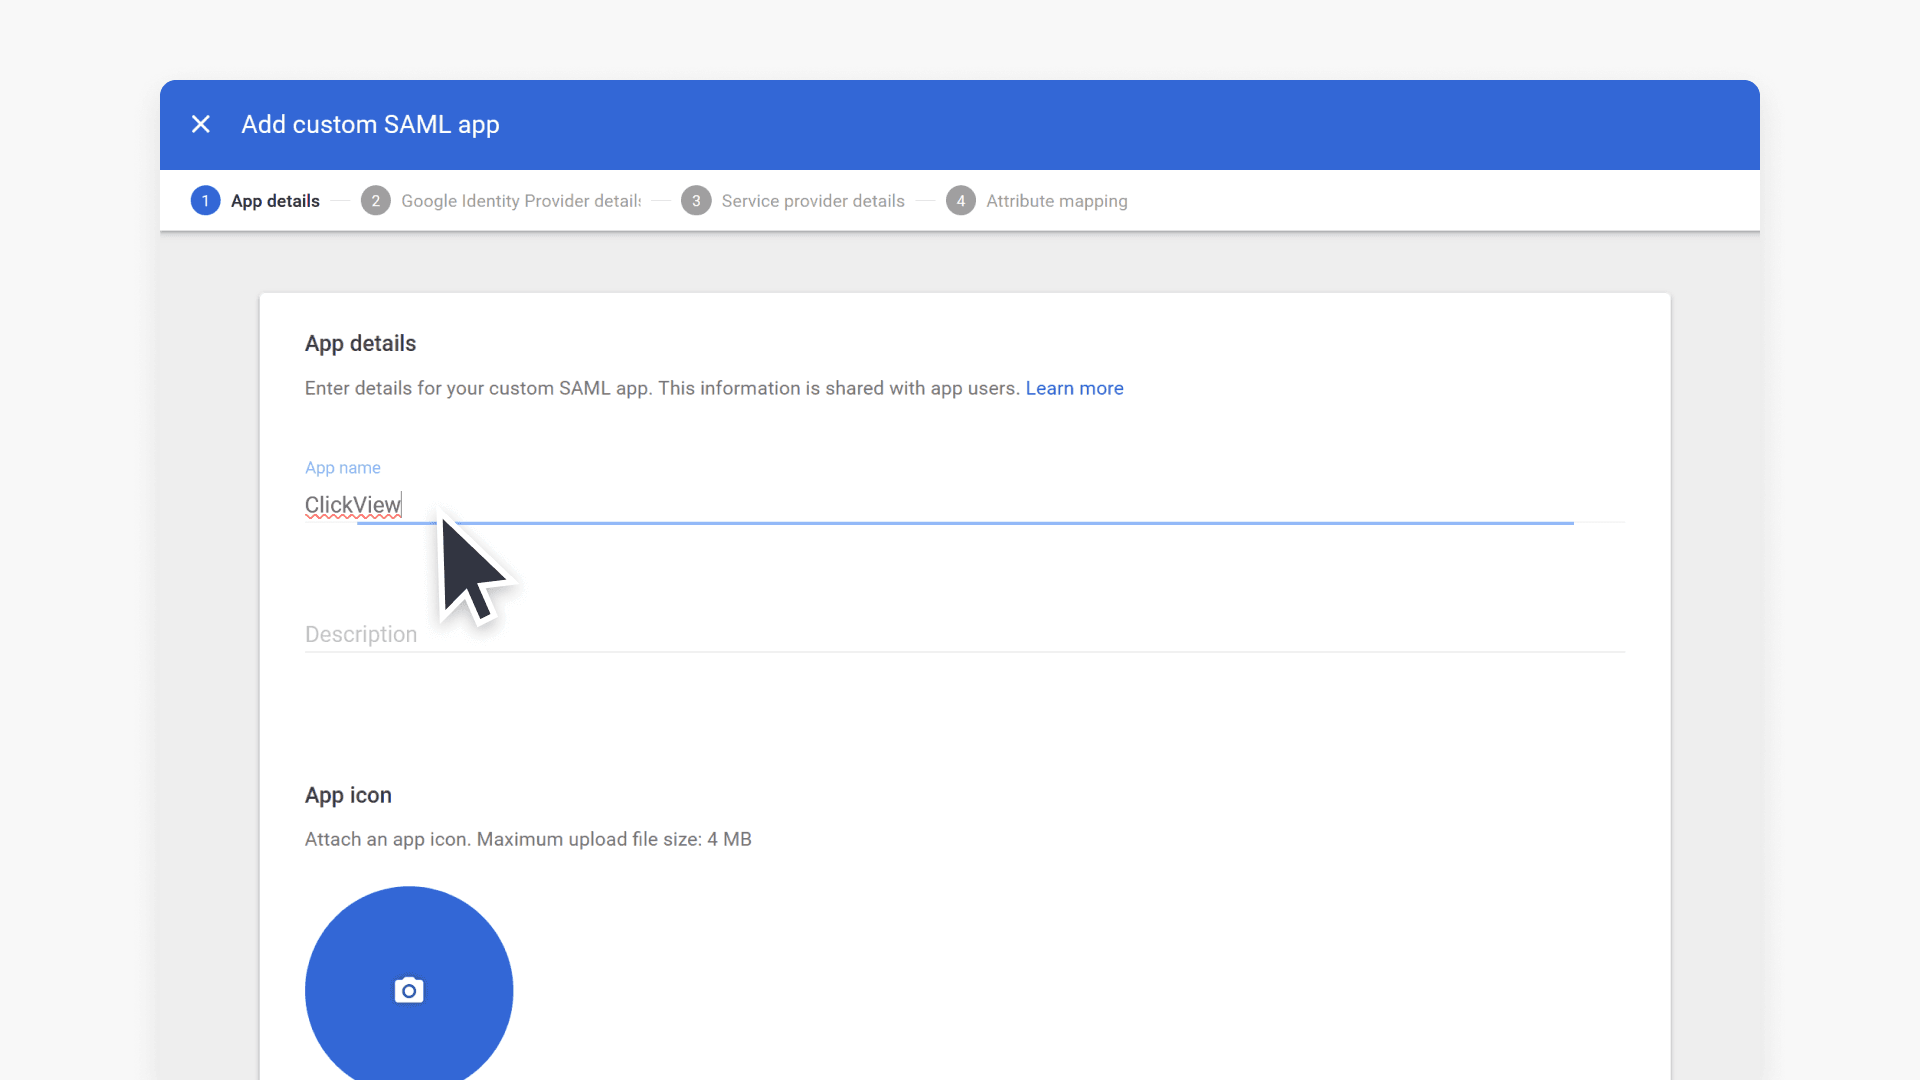
- Select Add app, then Add custom SAML app.
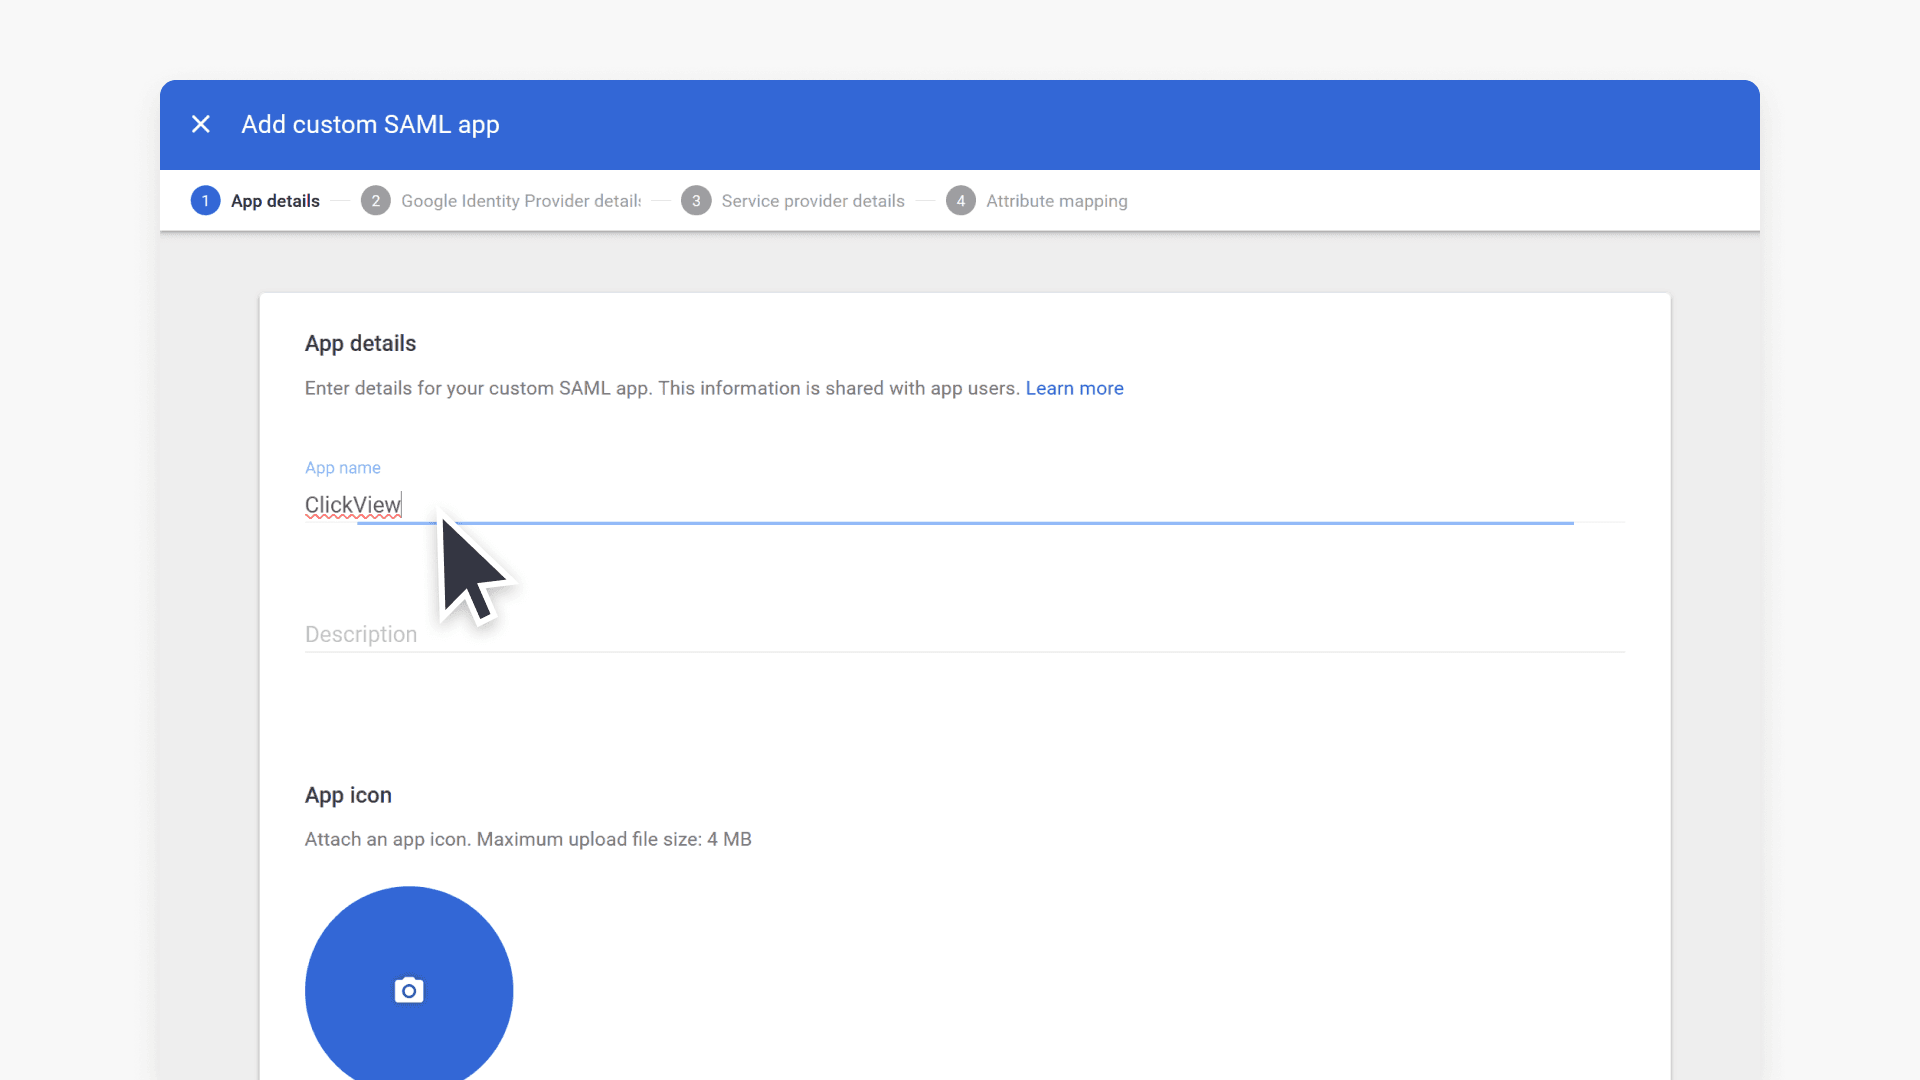
- Enter the app name as ClickView, then select Continue.
Step 3: Copy your Google IdP details
- Copy the SSO URL and EntityID:
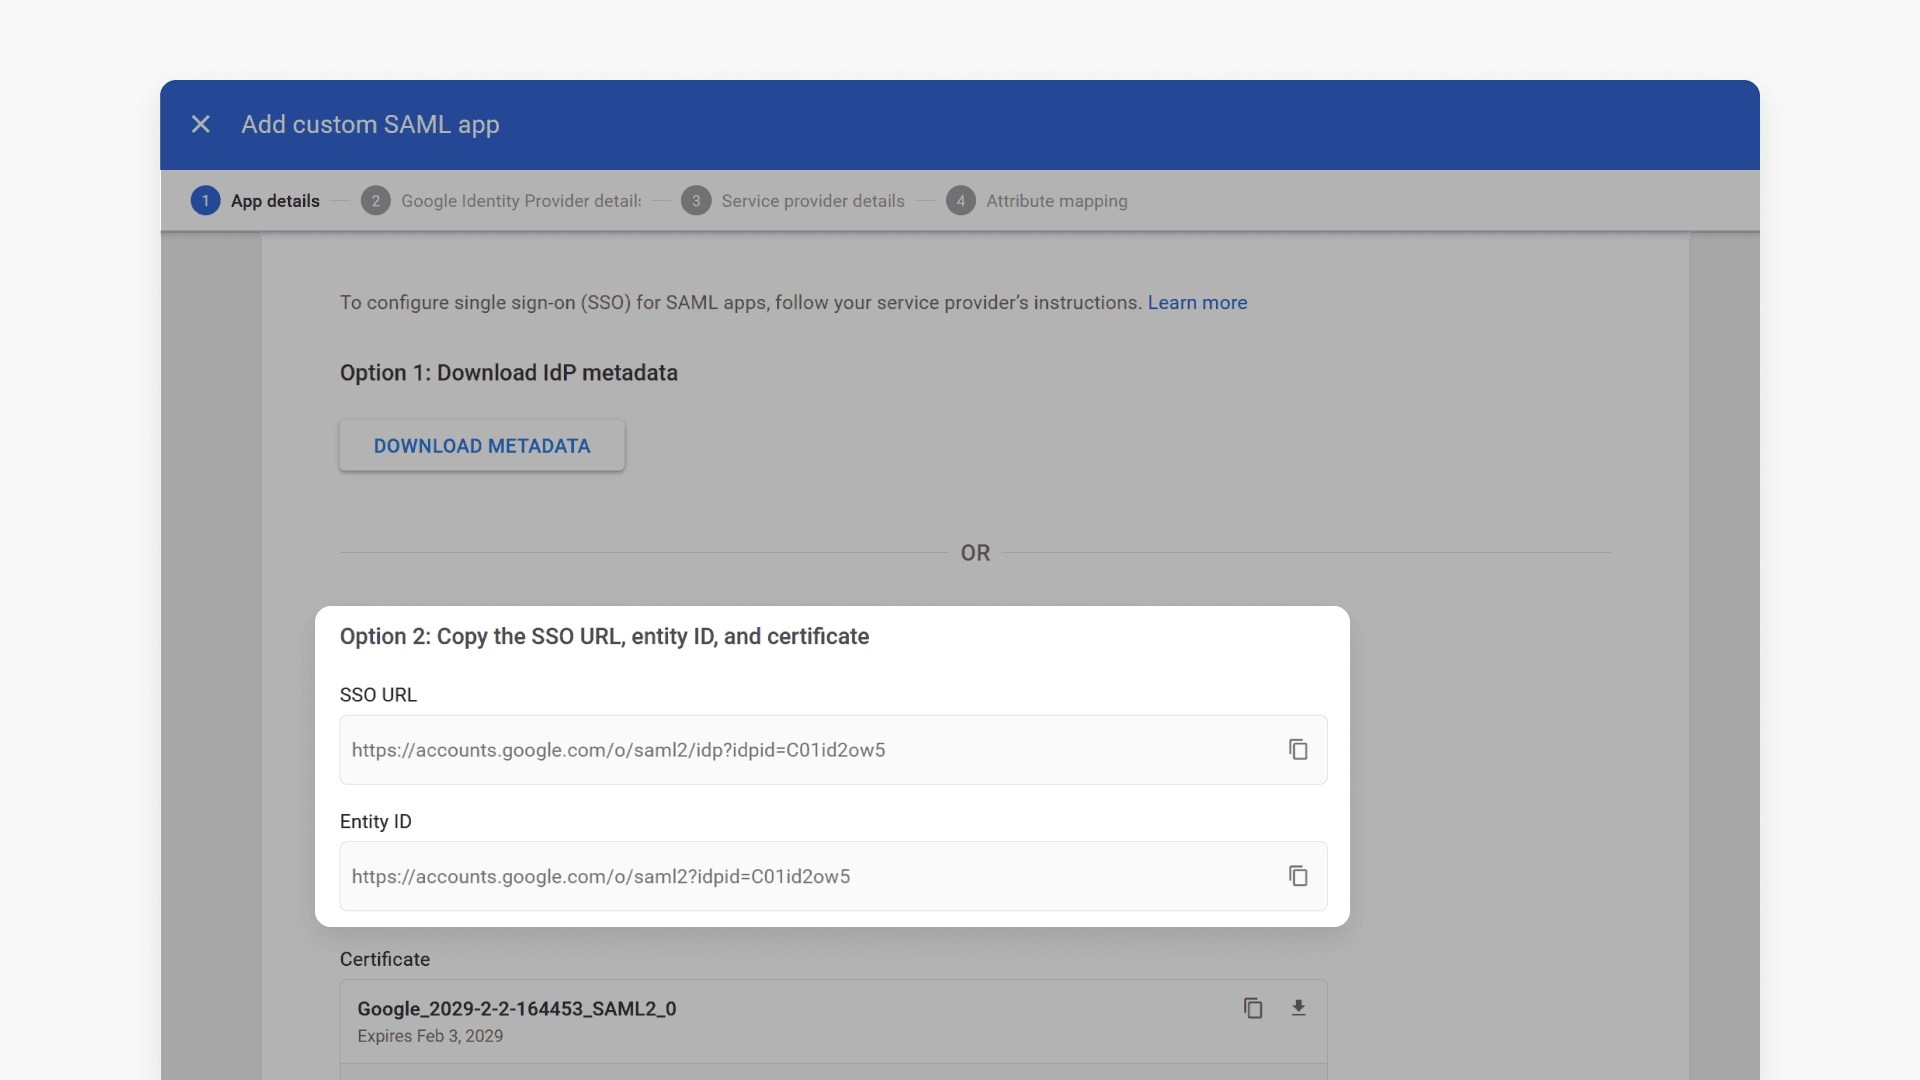
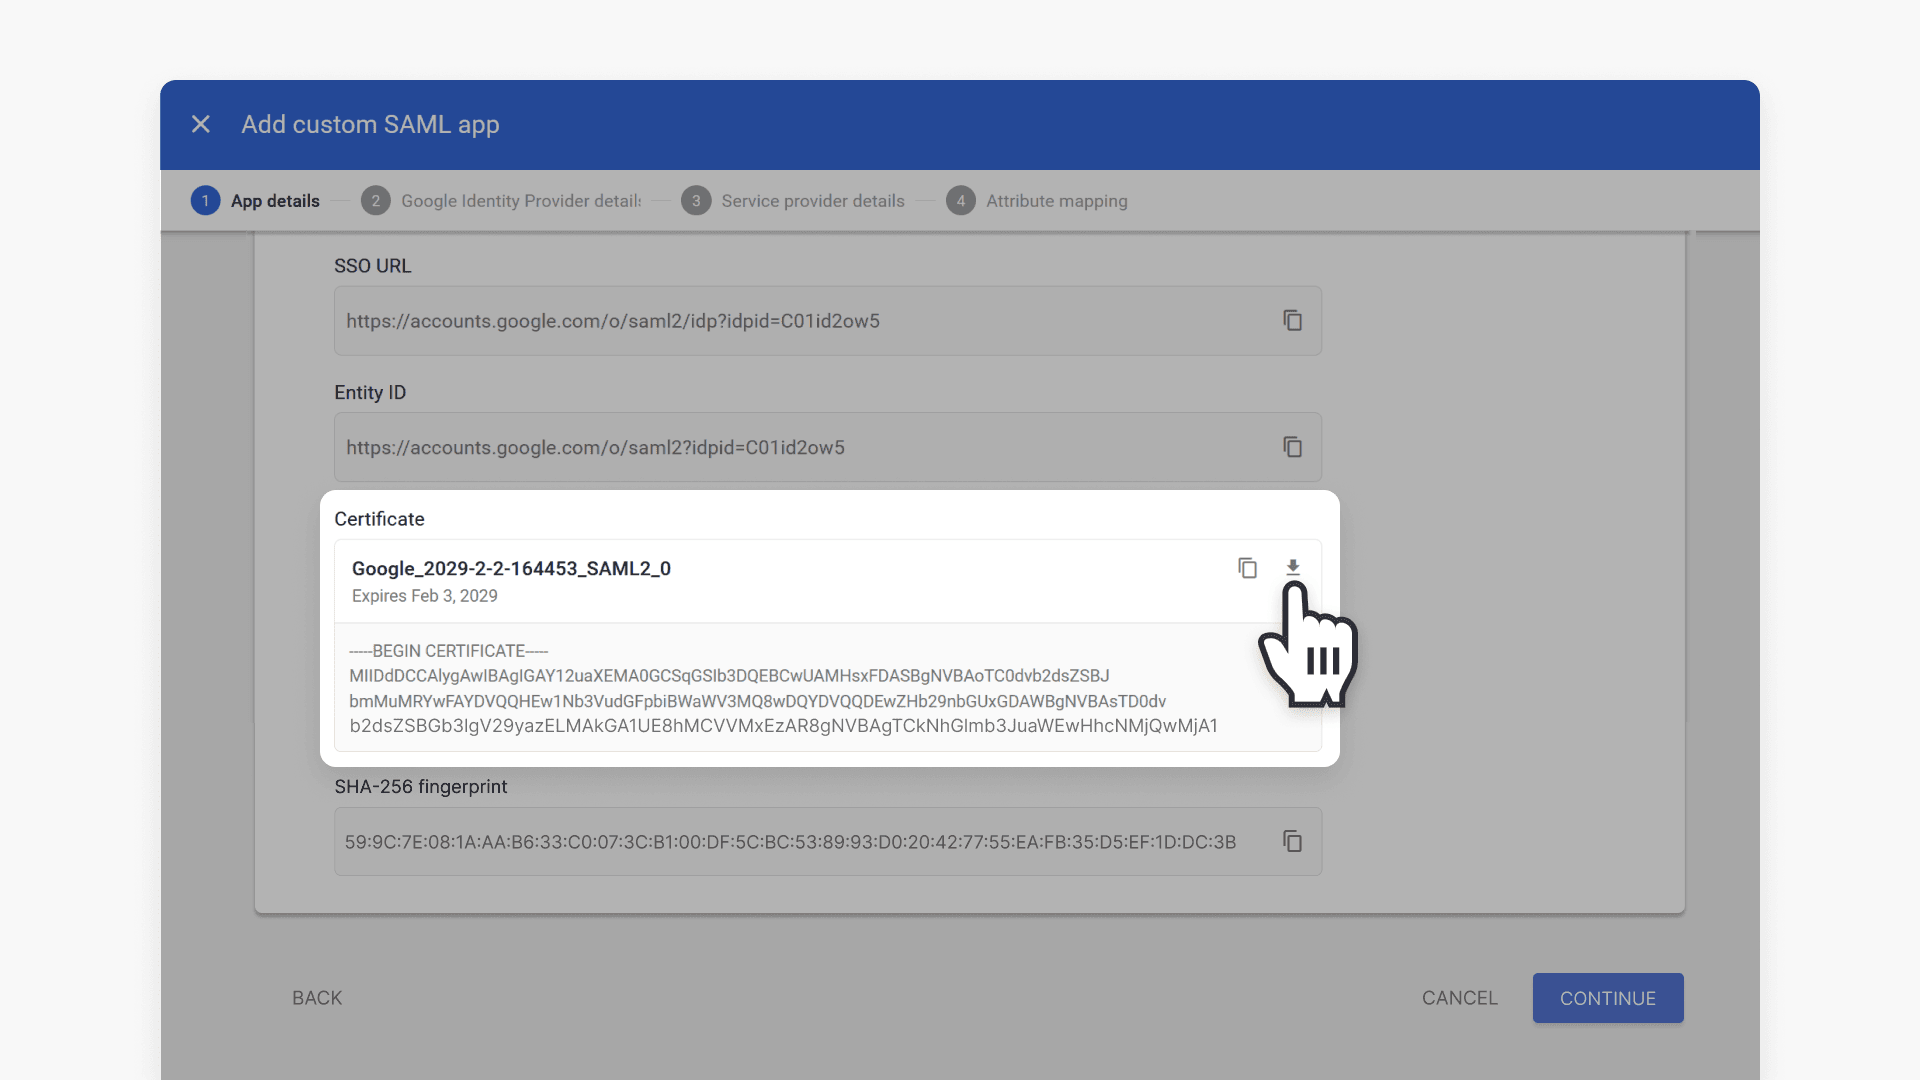
- Download the Certificate by selecting the download icon (the downward-pointing arrow).
Contact ClickView Support
Send an email to support@clickvieweducation.com with the following:
- SSO URL and Entity ID (copied in Step 3)
- Certificate file (downloaded in Step 3)
ClickView Support will reply with an ACS URL and Entity ID for your instance. You need these to continue, so wait for their reply before moving to Phase II.
Phase II: Configure service provider details
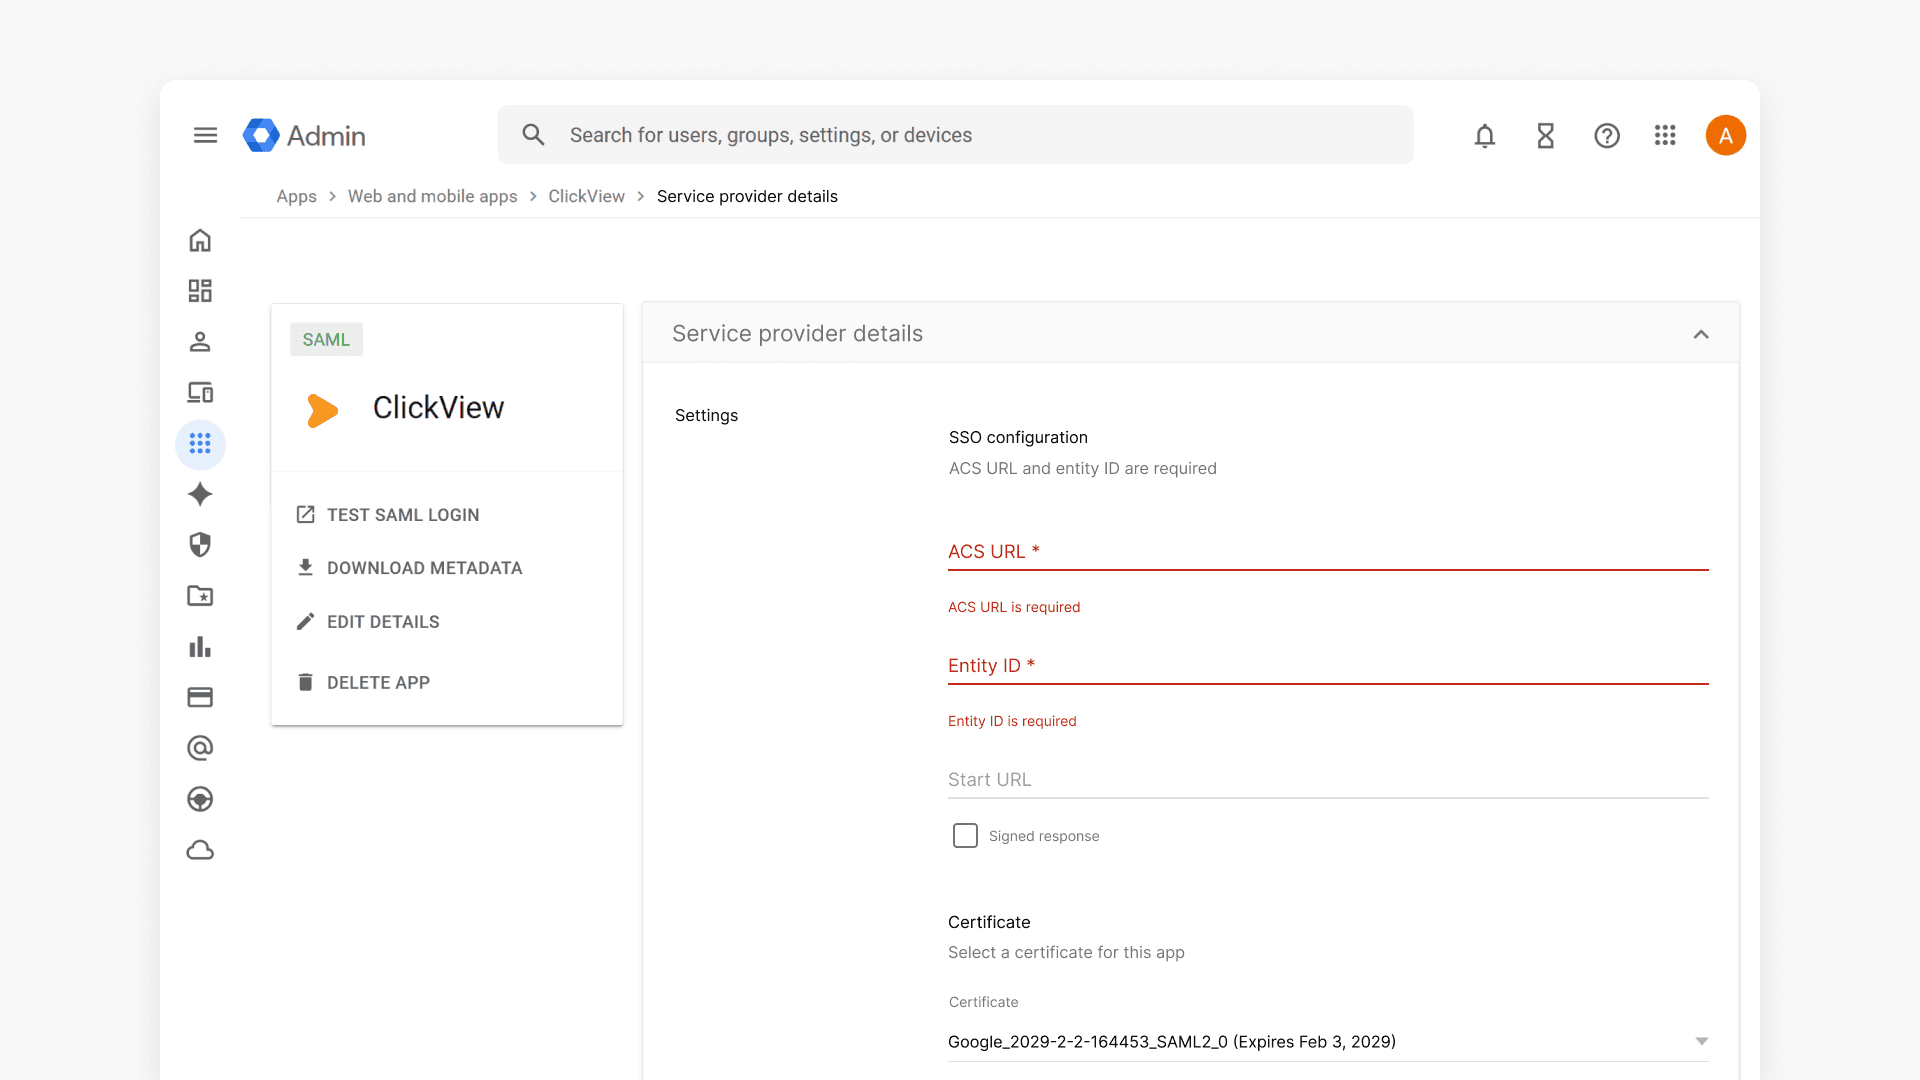
Step 4: Enter your ClickView service provider details
- Select Continue to add the ClickView service provider details.
| Field | Value | |
| 1 | ACS URL | Provided in a reply email by the ClickView Support team |
| 2 | Entity ID | Provided in a reply email by the ClickView Support team |
- Once ClickView Support gives you the values, enter them in the ACS URL and Entity ID fields. Then select Continue to move on to attributes and mapping.
Quick decision: how will you identify users?
Before you begin Phase III, decide how you’ll pass two pieces of information to ClickView:
- User role — is this person a staff member or a student? If a student, what year level?
- School — which school within the Multi Academy Trust does this user belong to?
Google Workspace gives you three attribute types to work with:
| Attribute type | What it contains | |
| 1 | Organisation Unit Path (OU) | The OU path the user sits in (e.g. /Lincoln High/Students/Year 9). Called Organisation Unit in the US. |
| 2 | Department | The Department field value set on each user’s profile |
| 3 | Google Groups | The groups a user is a member of |
Pick the approach that best matches how your Google Workspace is already structured:
| Approach | Role attribute | School attribute | |
| 1 | A: One attribute for both | One attribute encodes both (e.g. a structured OU path: /Multi Academy Trust/SchoolName/Staff) | Same attribute as role |
| 2 | B: Two separate attributes | One attribute (e.g. OU path → role) | A different attribute (e.g. Department → school name) |
| 3 | C: Any other combination | Any of the three attribute types | Any of the three attribute types |
| 4 | D: Your own custom attributes | Any Google Workspace attribute available in your environment | Any Google Workspace attribute available in your environment |
Not sure which approach to use? Email support@clickvieweducation.com before you start. The ClickView Support team can advise based on how your Google Workspace is set up.
Phase III: Map attributes and enable the app
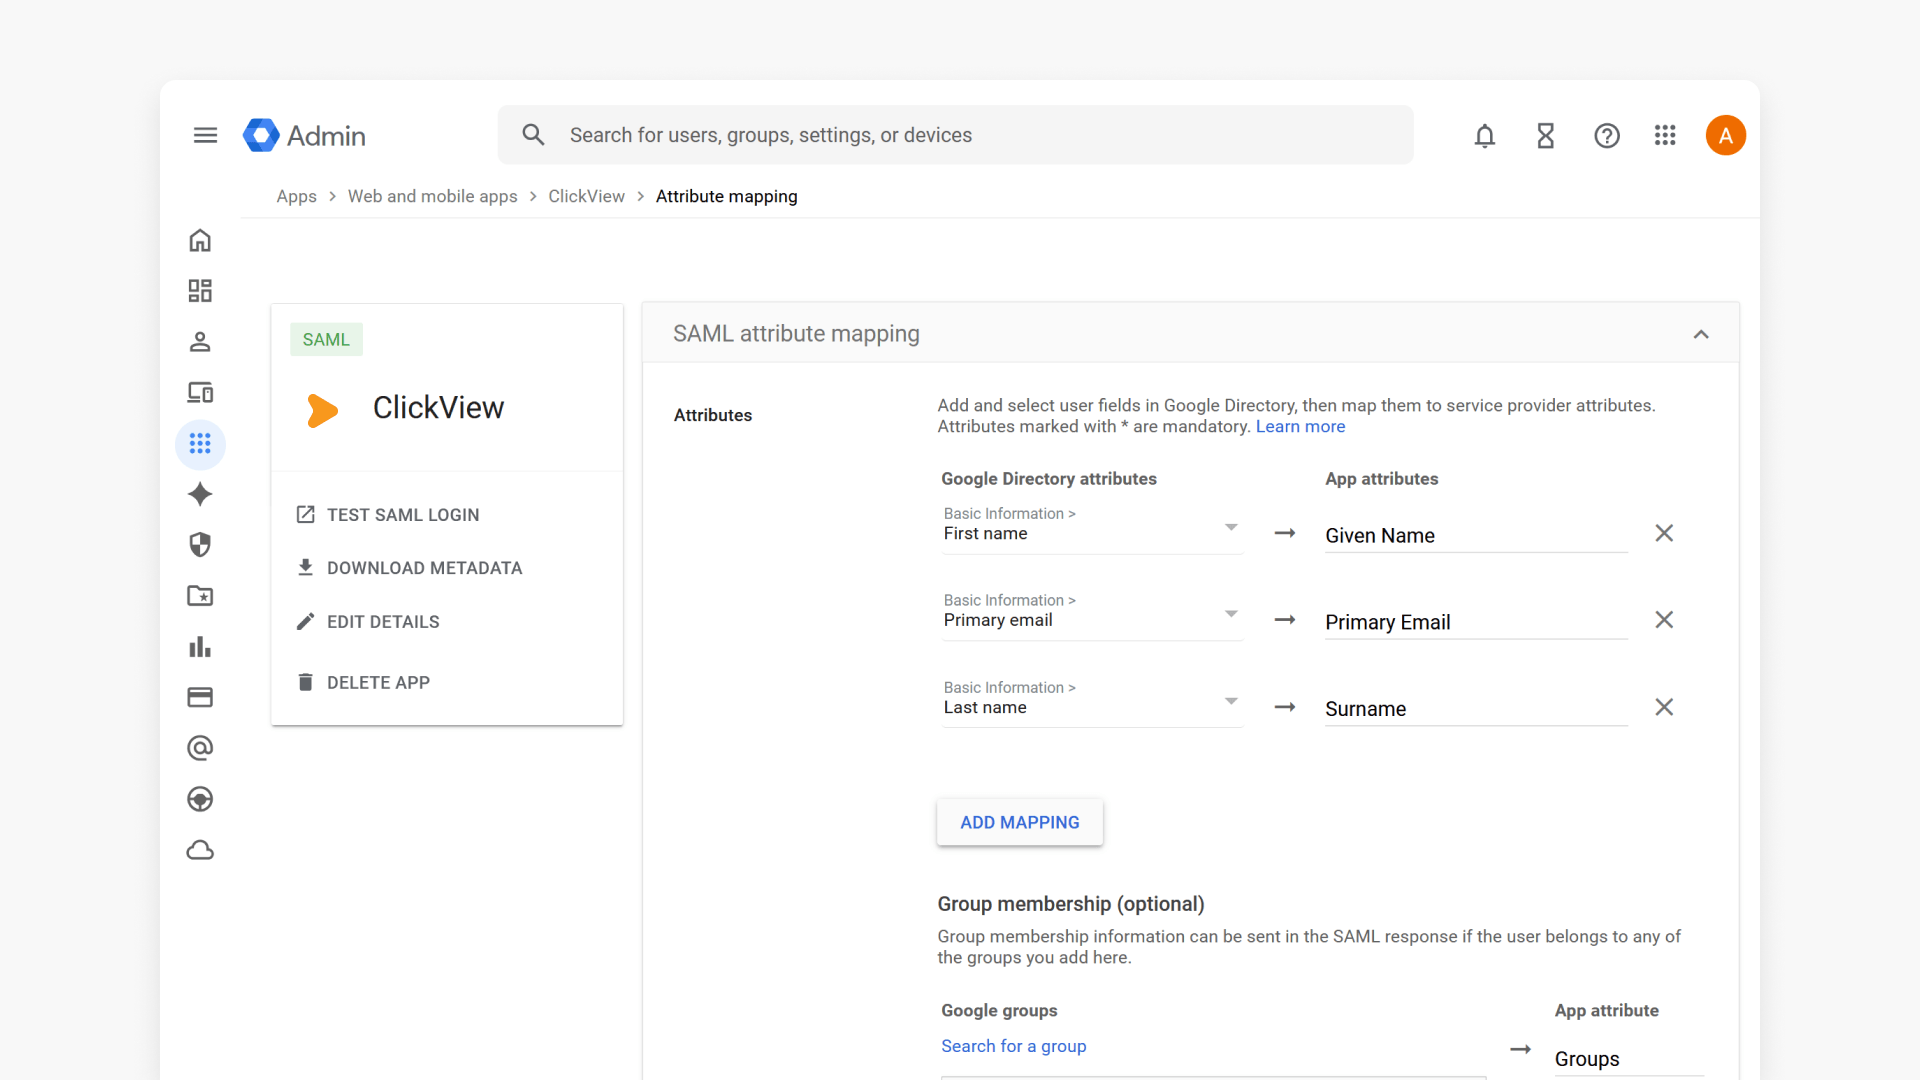
Step 5: Add the basic user attribute mappings
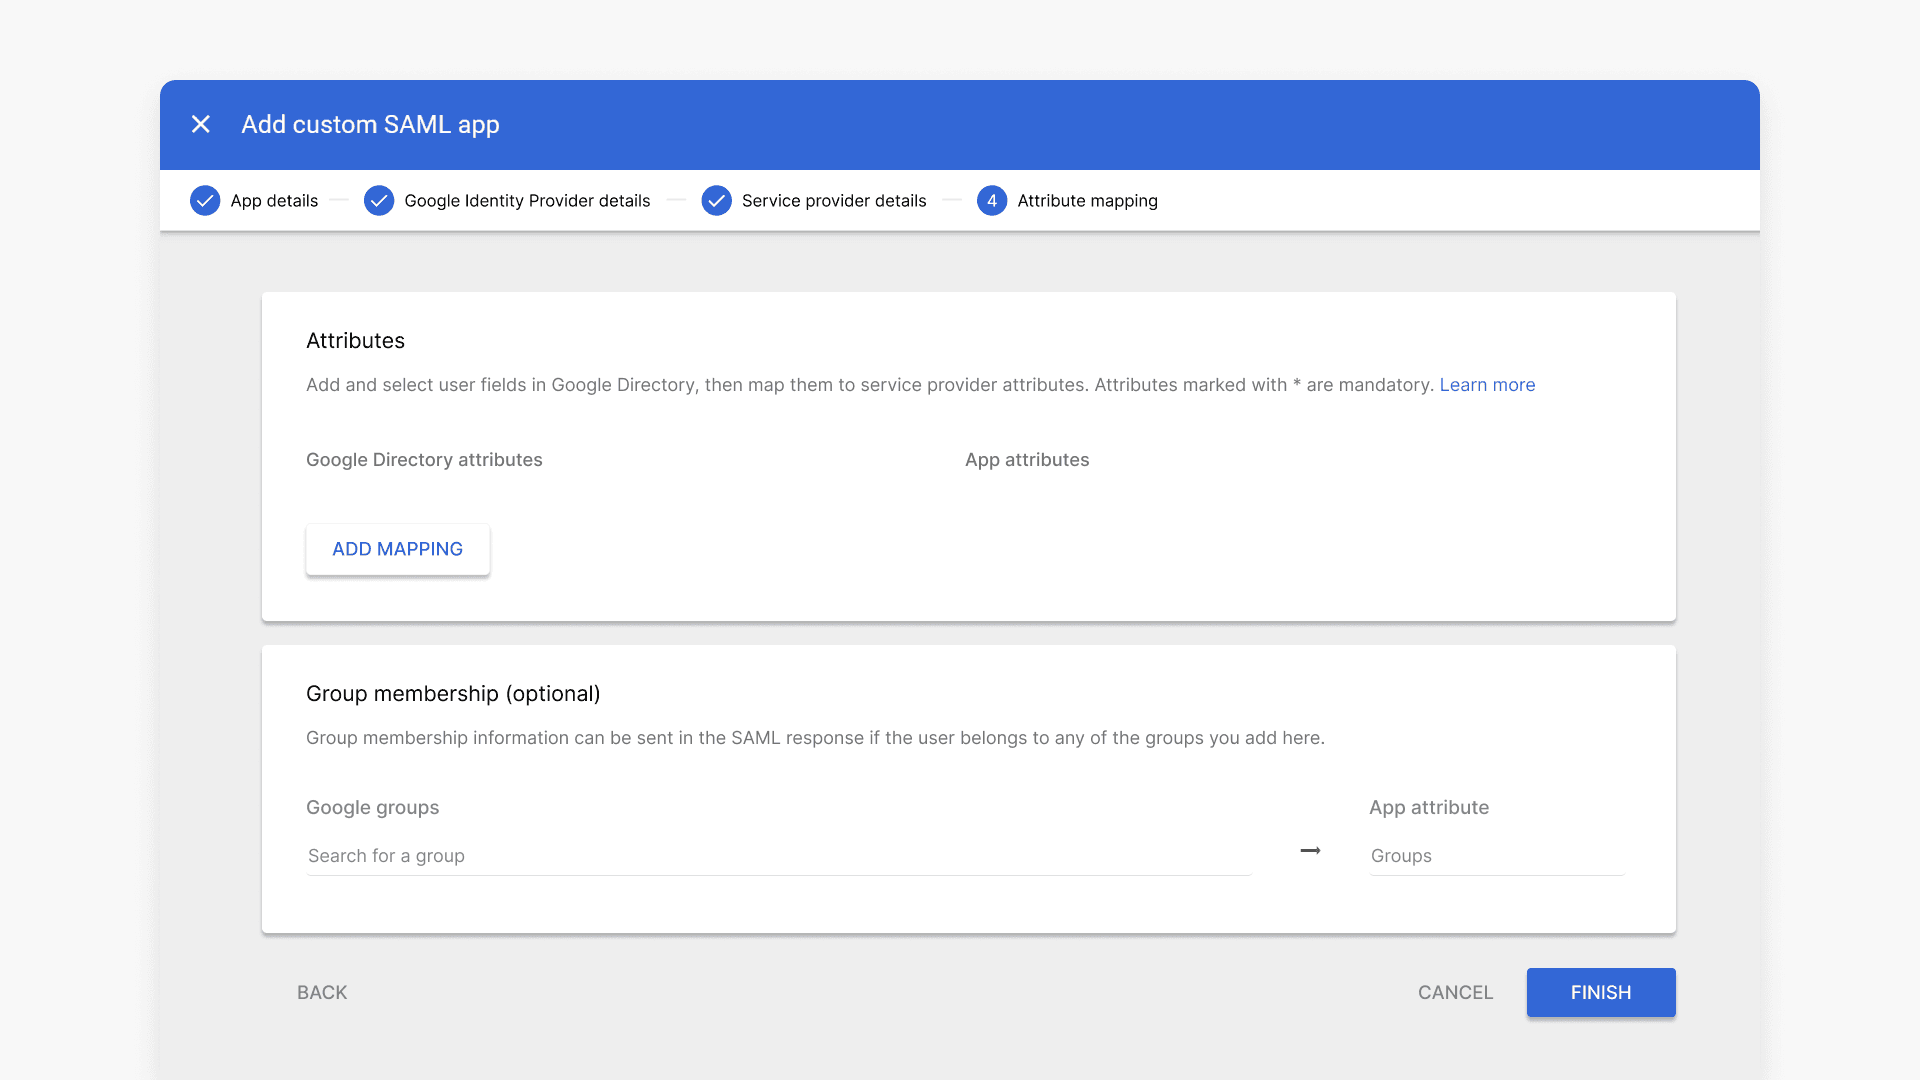
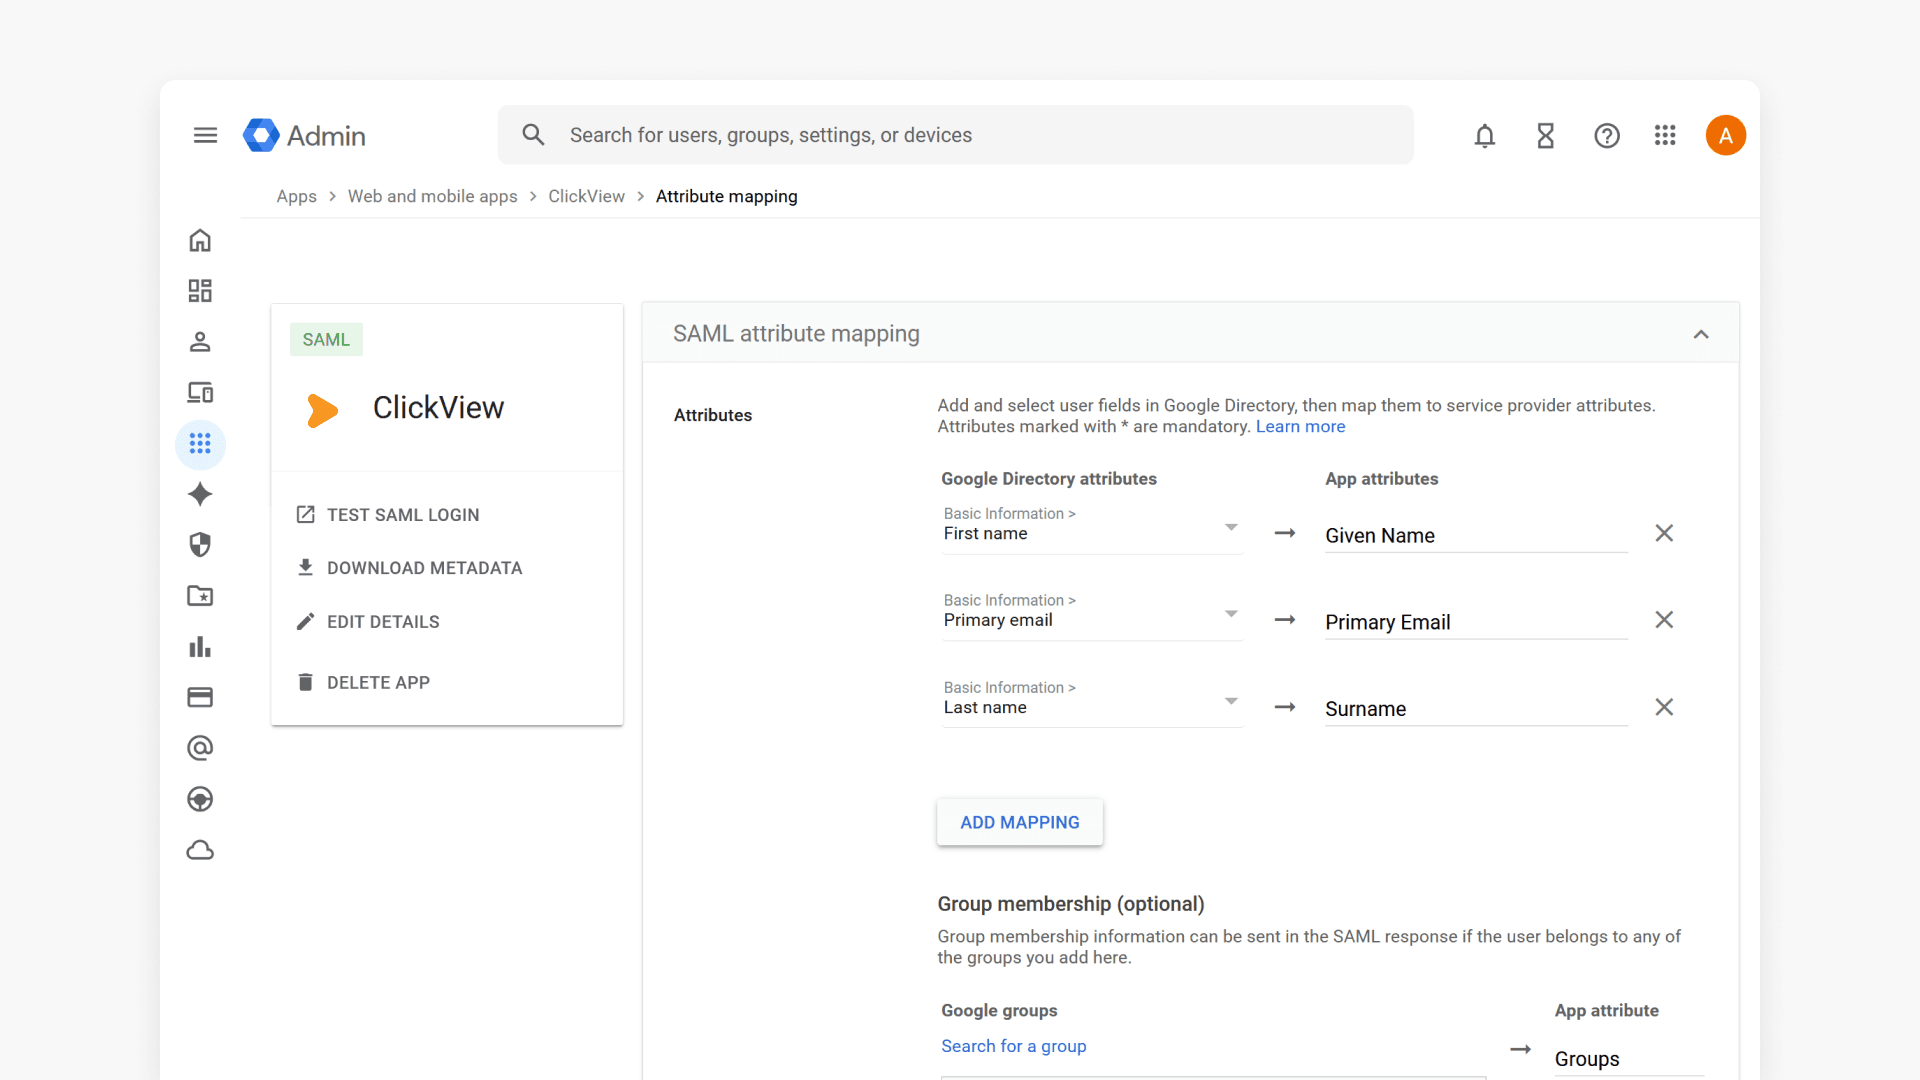
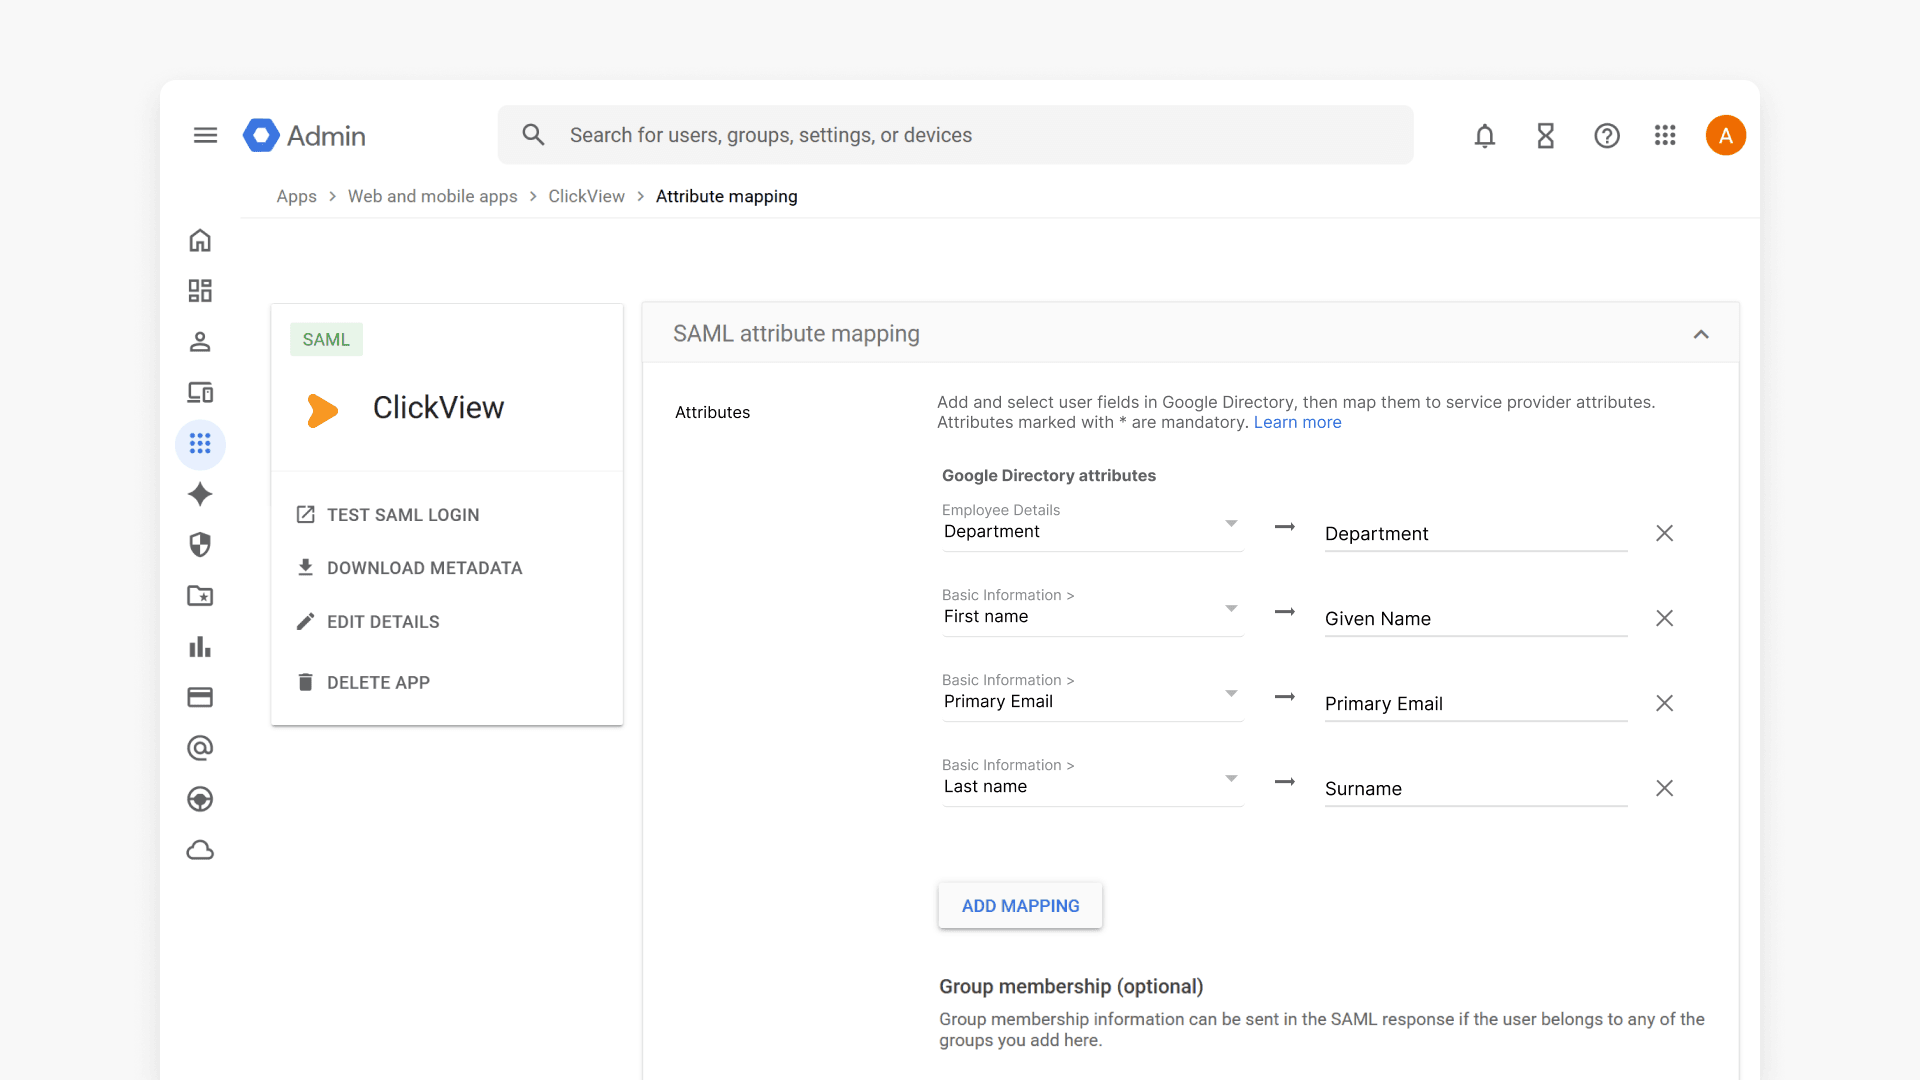
- In the Attribute mapping section, select Add mapping and add the following basic attributes.
- Select the attributes in the Attribute column from the dropdown menu, then enter the corresponding values in the Maps To column manually. Enter these exactly as shown. The setup is case-sensitive.
| Attribute name | Value | |
| 1 | First name | Given Name |
| 2 | Last name | Surname |
| 3 | Primary email | Primary Email |
The attributes in the Attribute name column are selected from the drop-down menu, while the corresponding values in the Value column are entered manually. Please fill these in exactly as shown, as the setup is case-sensitive.
Step 6: Map your role and school attributes
Using the approach you decided on in the Quick decision section, add the attribute mappings for role and school identification. Choose the App attribute name carefully; these names are used by ClickView to process the values.
| What it identifies | Recommended App attribute name | |
| 1 | User role (staff/student) | Role |
| 2 | School within the Multi Academy Trust | School |
If you’re using one attribute for both role and school, map it once and let ClickView Support know the format of the values (e.g., Multi Academy Trust/ABC High/Students/Year 9) so they can configure parsing correctly.
Option A: Using organisation unit path
Best if your users are already organised into OUs by role or year group (e.g. /ABC High/Staff or /ABC High/Students/Year 9). The OU path is passed directly to ClickView and used to determine the user’s role.
- In SAML attribute mapping, add the Organisation unit path in the Google Directory Attributes drop-down menu.
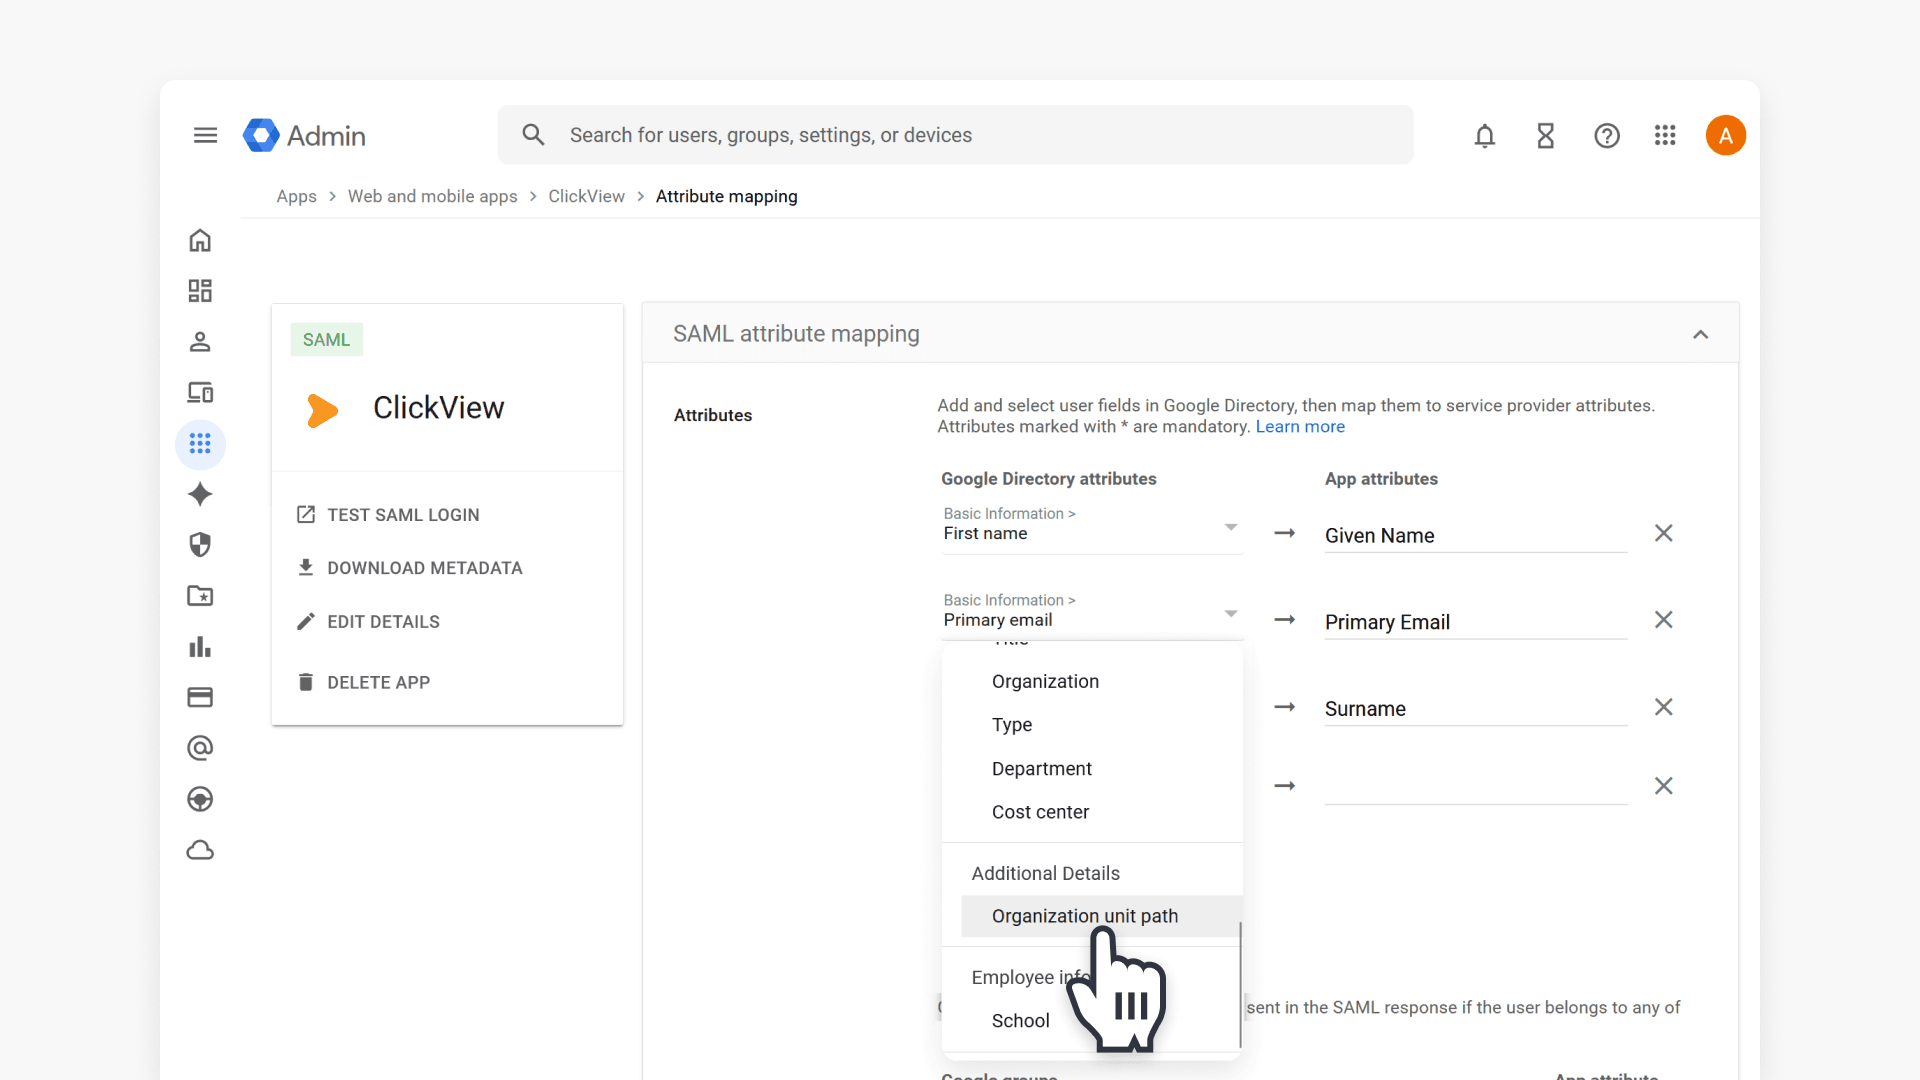
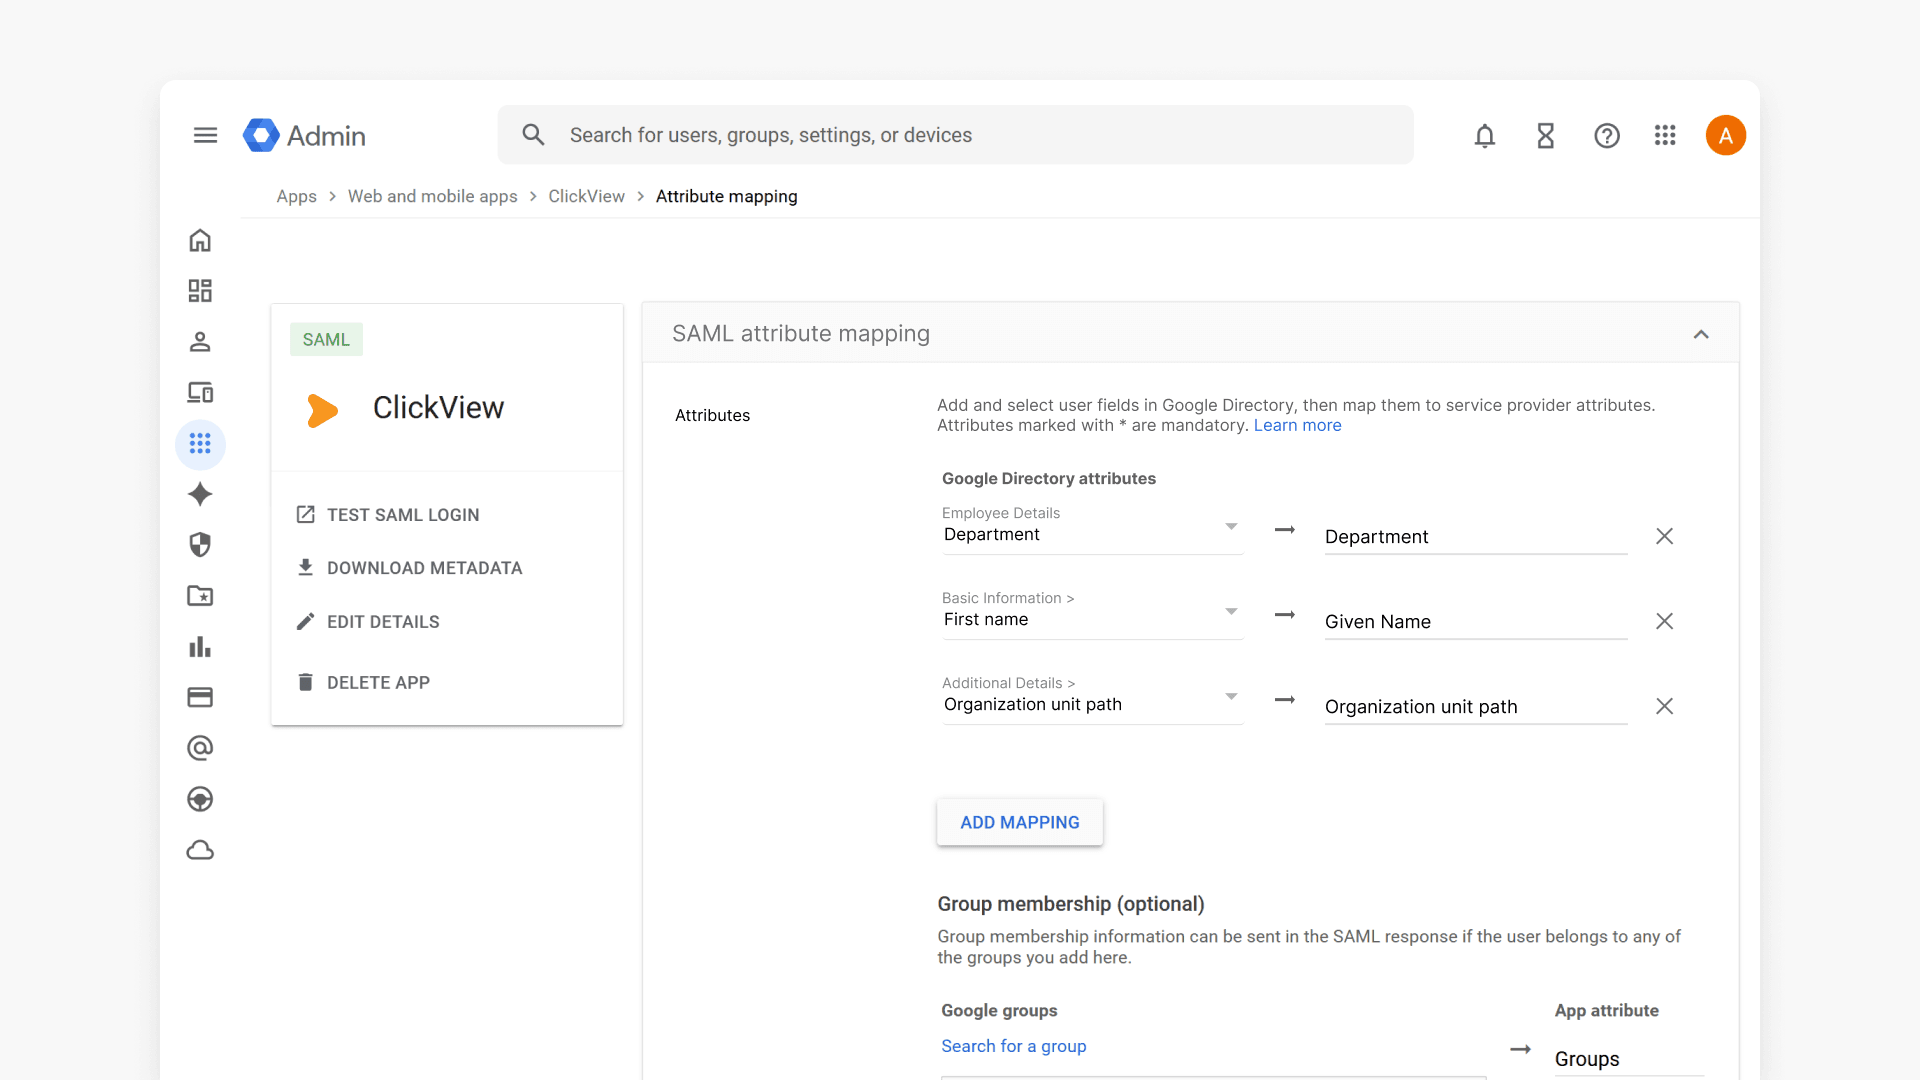
- Map to Organisation unit path in the App attribute. Click Save.
Option B: Using Google groups
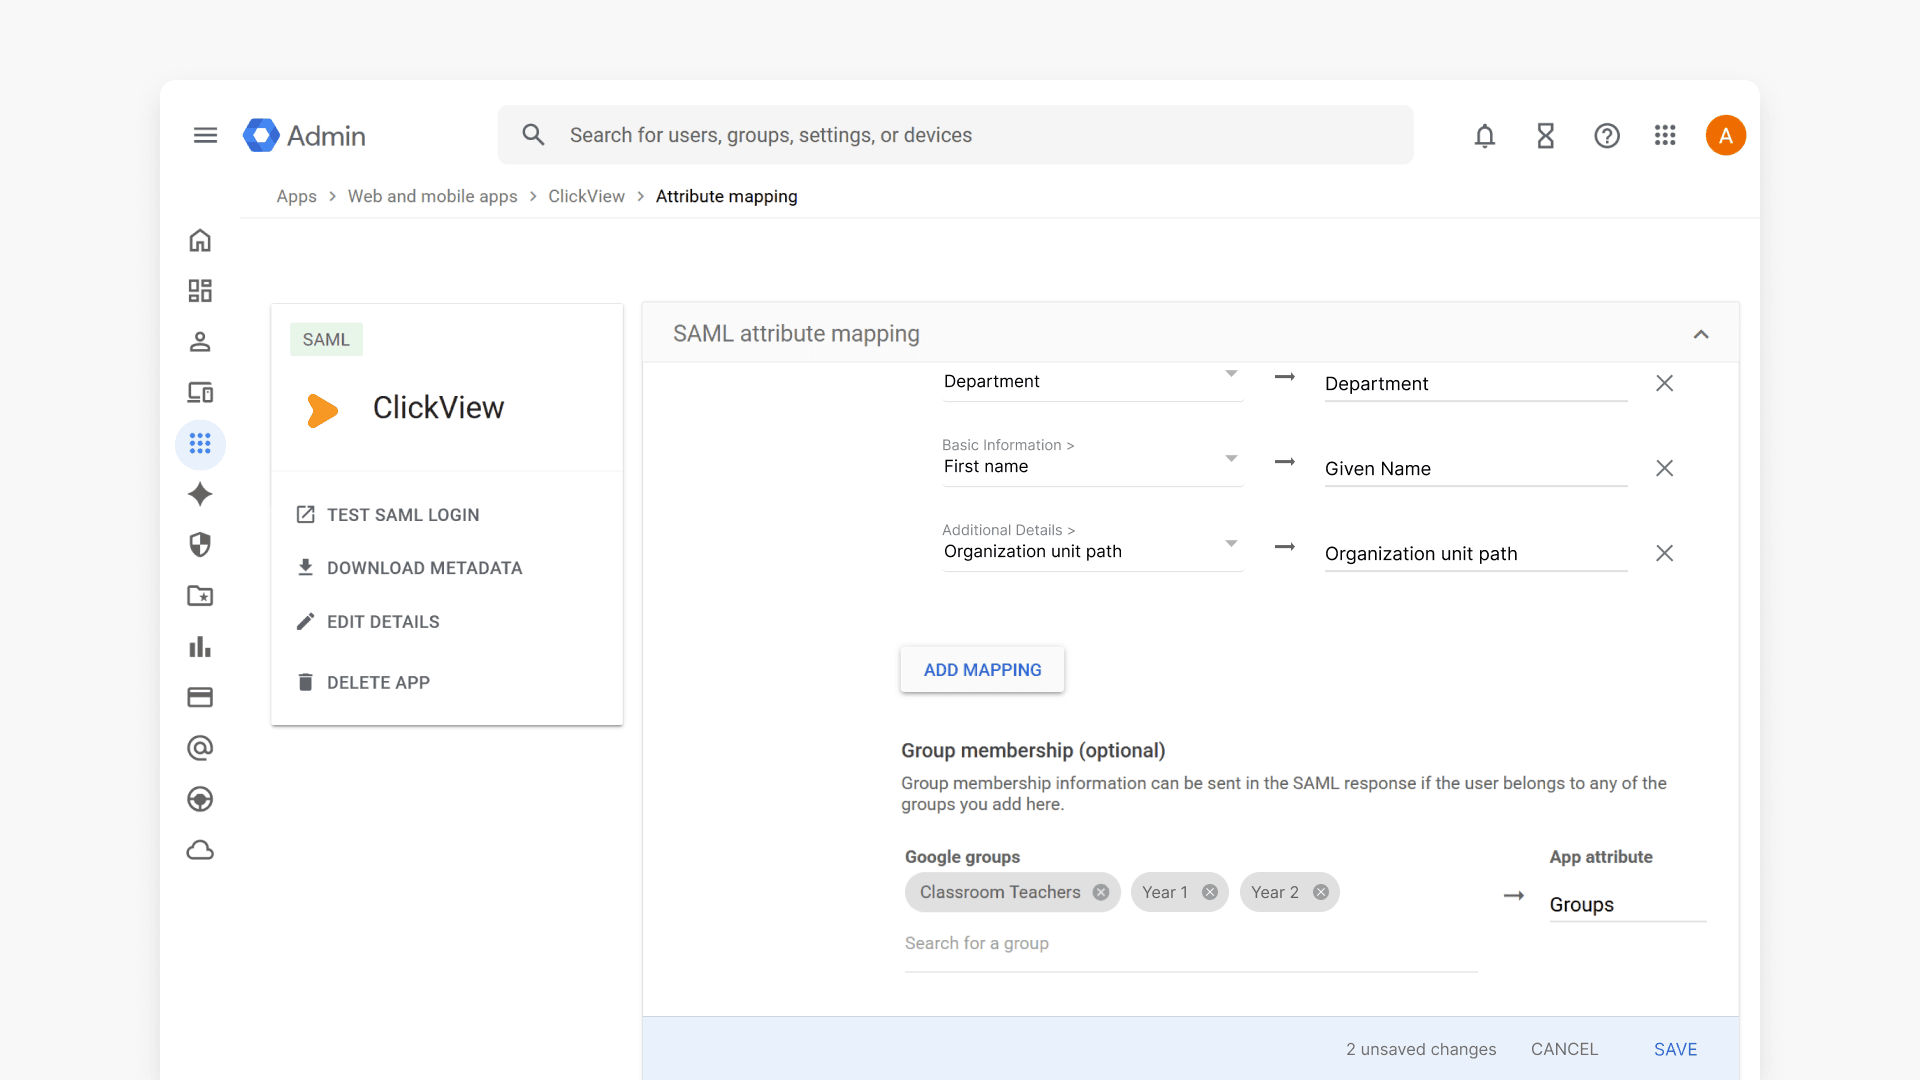
- In SAML attribute mapping, scroll to the bottom and search for the desired groups under the Group membership (optional) heading
- Enter the ‘App attribute’ value as ‘Groups’. Click Save.
Option C: Using the Department field
- In SAML attribute mapping, add Department. Click Save.
Option D: Your own custom attributes
If none of the above match how your Google Workspace is structured, use any user attribute available in your environment, such as a custom schema field or employee ID format, as long as it carries the role or school information you need.
- In SAML attribute mapping, select Add mapping.
- Select the attribute that holds the relevant information from the dropdown, choosing any attribute visible in your Google Workspace user profiles
- Enter the App attribute name: Role, School, or a single shared name if the attribute encodes both, then select Save
Not sure if your attribute will work? As long as the attribute is available in Google Workspace’s SAML attribute mapping drop-down and contains consistent, parseable values, ClickView Support can configure it on their end. When you reach Step 8, include the attribute name and a few example values so Support can confirm.
Step 7: Enable the SAML app for all users
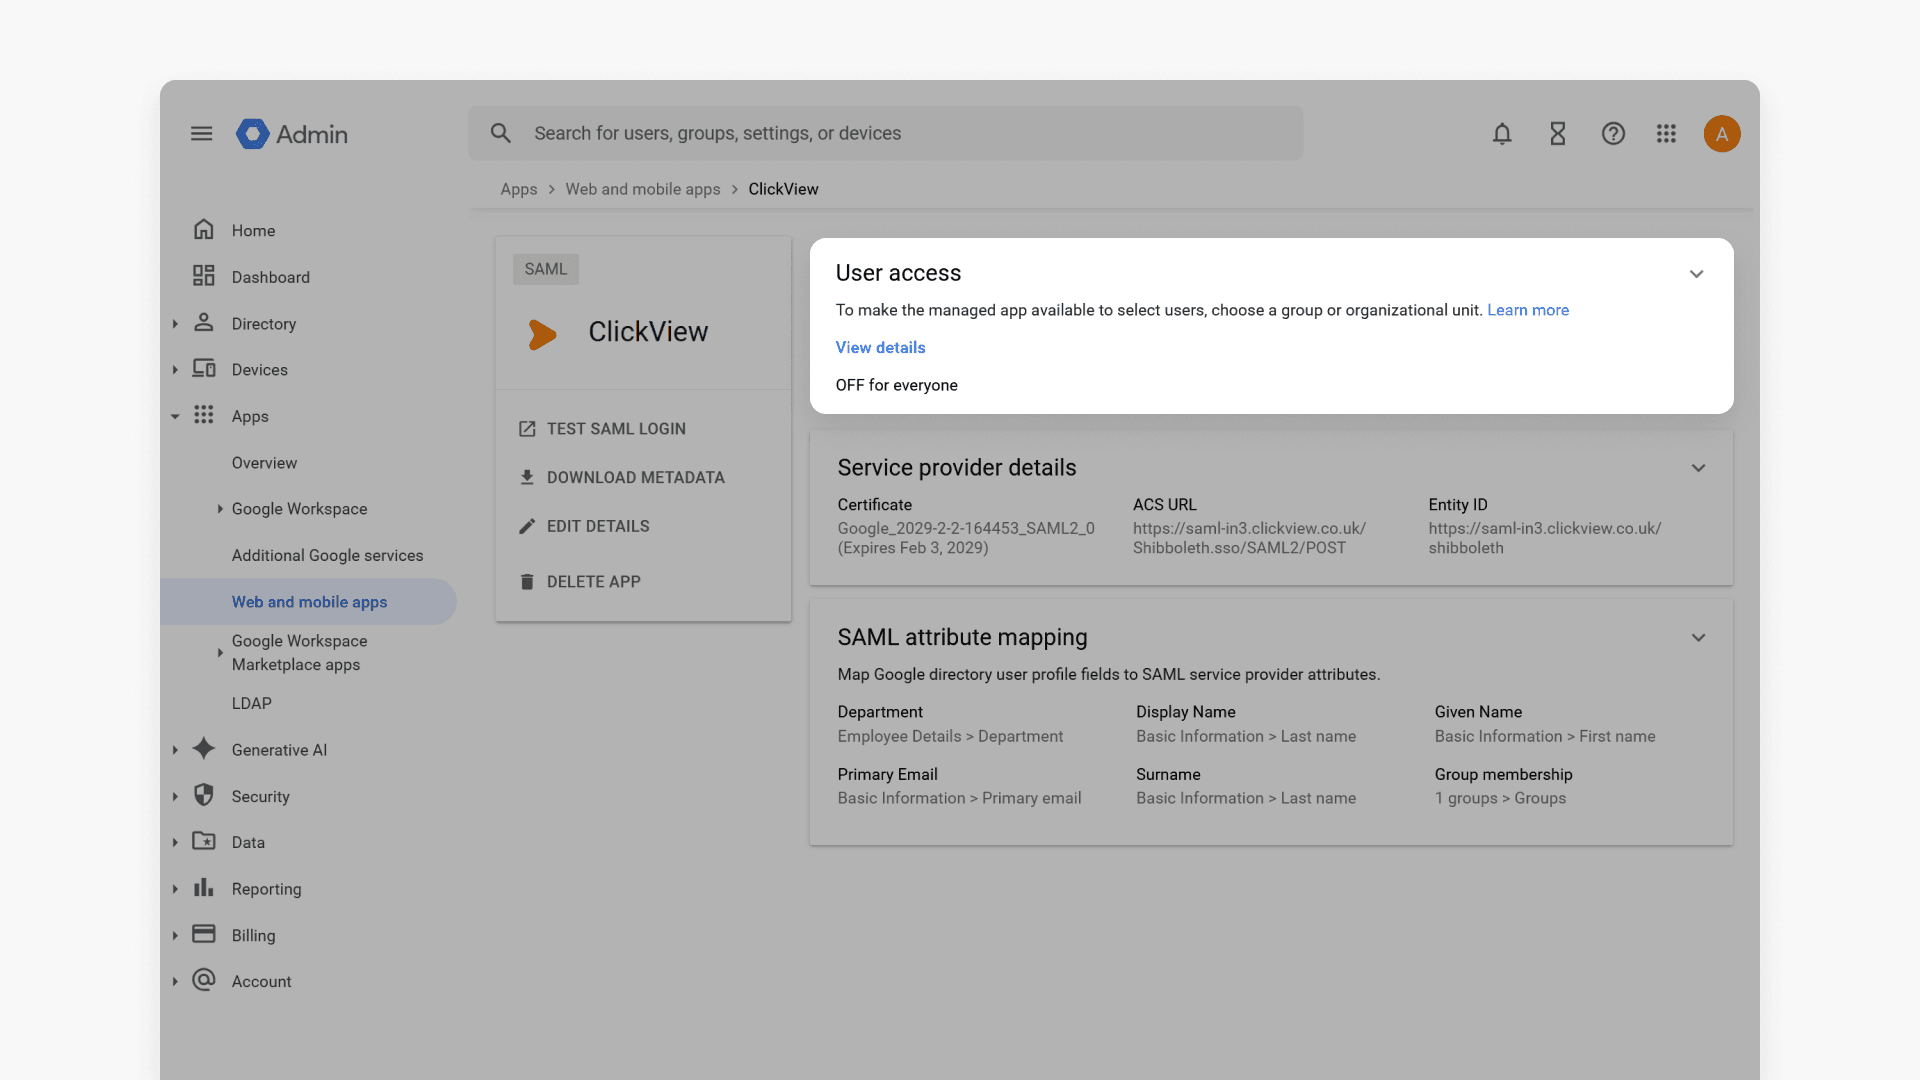
- After the ClickView SAML app is added, open the expand panel and change the setting from OFF for everyone to ON for everyone, then select Save.
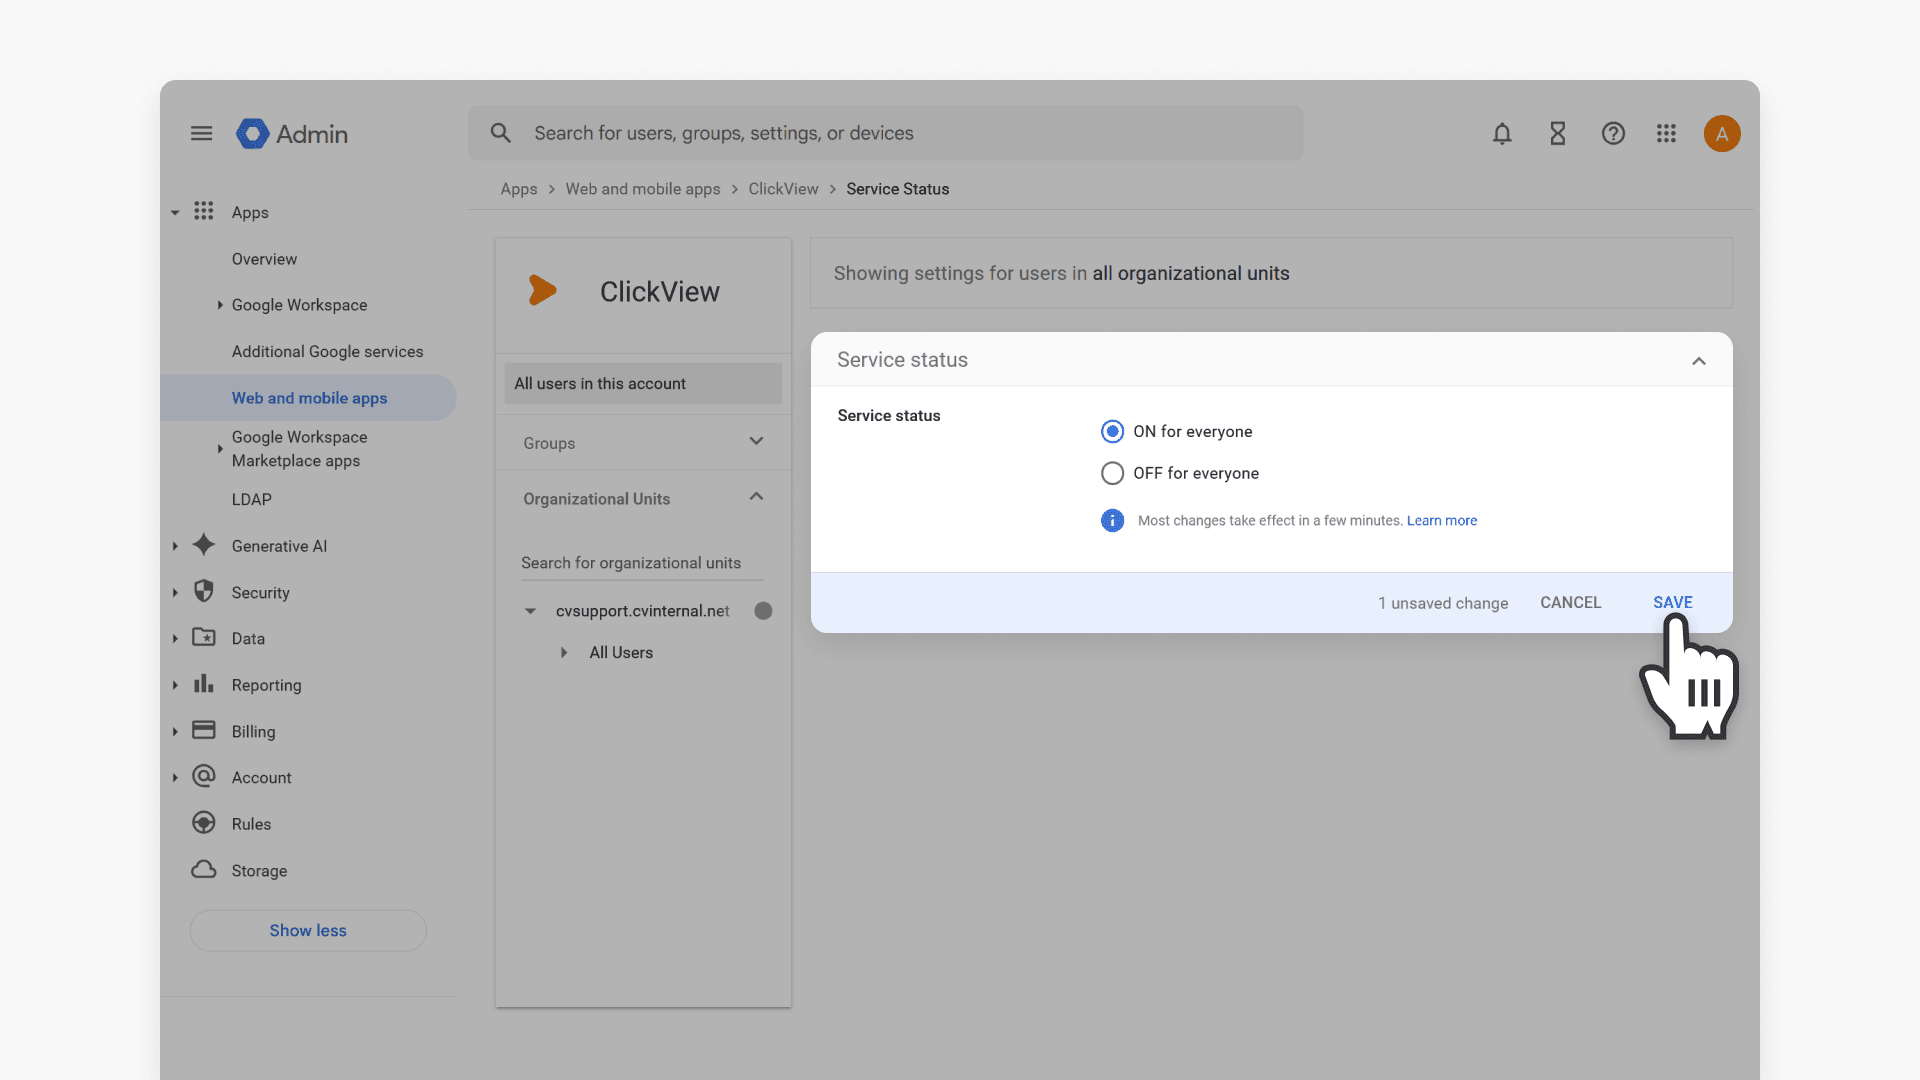
- Once the app is enabled, go to https://clickview.net/ to test the SSO login. This change may take up to 24 hours to apply across all users.
Step 8: Share attribute details with ClickView Support
Once you’ve confirmed your attribute mappings for both role/grade and school assignment, download and complete the school list spreadsheet and send it to ClickView Support:
- Download the District/School List spreadsheet for your Multi Academy Trust
- Email the completed spreadsheet to support@clickvieweducation.com, including the attribute names and values you’ve used for staff, students, year levels, and school assignment.
Let ClickView Support know your attribute setup
Reply to the earlier email thread and include:
- The App attribute name you used.
- The attribute values from your Google Workspace (e.g., Multi Academy Trust/Lincoln High/Students/Year 9).
This allows ClickView Support to configure value parsing on their end before users sign in.
Once you’ve tested the login and confirmed it works, your users can sign in to ClickView via SAML SSO in Google Workspace.
Once you have tested the login and confirmed it is working, your users will be able to sign in to ClickView via SAML SSO through Google Workspace.
Quick reference
| Phase | What you do | Then | |
| 1 | Phase I | Create the SAML app; copy SSO URL, Entity ID, and certificate | Send details to ClickView Support and wait for the reply |
| 2 | Phase II | Enter the ACS URL and Entity ID from Support | Continue to attribute mapping |
| 3 | Phase III | Map basic attributes, configure role + school identification, enable the app | Email the completed spreadsheet and attribute details to Support. Test the login after confirmation at https://clickview.net/ |
Frequently asked questions
Get in touch
If you’re having trouble finding the right topics or videos, just reach out! Our team - 


 Andrew, Nisch, Janice, Pfreya, or any of us at ClickView - will be happy to help you get sorted.
Give feedback
Was this guide helpful?
Up Next
How to set up Google Workspace SSO for your School using the new SAML process
Summary How do I set up Google Workspace SAML SSO for ClickView at my school? To set up SAML SSO for ClickView, create a custom SAML app in your Google Workspace Admin console and send your SSO URL, Entity ID, and certificate to ClickView Support, who will reply with your school-specific ACS URL and Entity […]